
 During the Second World War the Soviets relied heavily on the use of tractors for their heavy artillery and mortars to make their way across the battlefield. The most ominous of these was the ChTZ S-65 “Stalinez” tractor which was built in the Chelyabinskiy Traktornyy Zavod (ChTZ ) in the city of Chelyabinsk. Founded in 1933, the ChTZ factory began producing agricultural tractors first with the S-60, which was a copy of the American built Caterpillar 60 which was followed by an improved diesel powered version, the S-65. With the outbreak of war in 1941 the majority of the 37,626 Sons of Stalin (Stalinez) were pressed into military service where they were used to pull the larger Soviet artillery guns such as the 152 mm M1937 ML-20 and the B4 M1931 203mm Howitzers.
The S-65 tractor, although strong and durable was incredible slow with a maximum speed of only7 miles per hour (11 Km/H). During the invasion of Russia the Germans captured thousands of these hefty vehicles which were immediately pressed into use as a recovery vehicle for pulling stuck vehicles from the heavy Russian mud during the fall period known as Rasputitsa, but more often than not the Germans also used the S-65 in their original role as artillery tractor pulling the sFH 18.
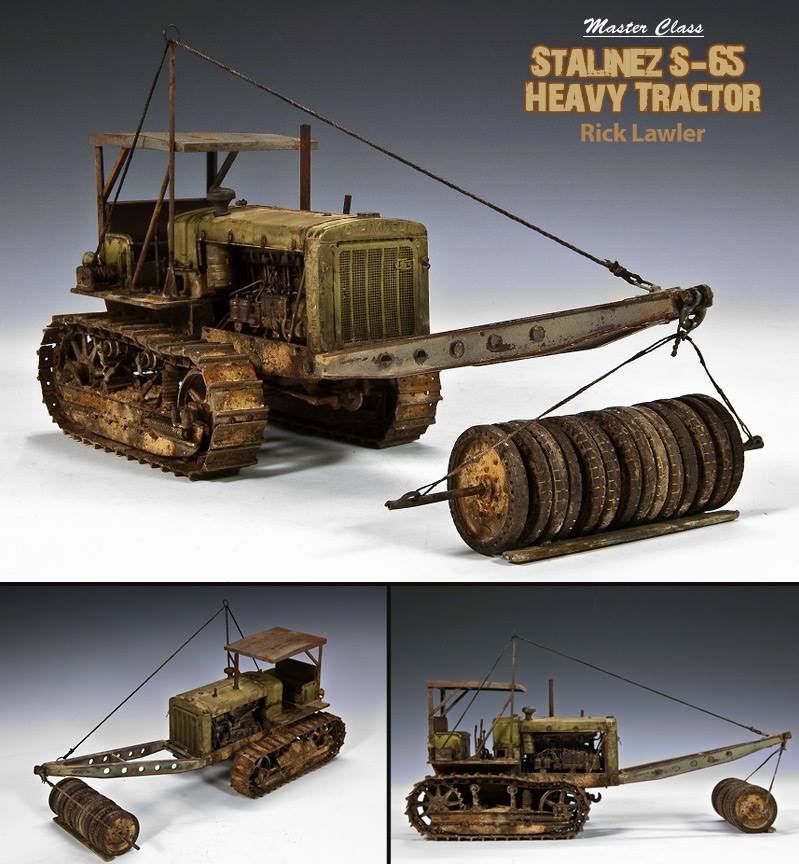
Ok, time for some honesty here; I should admit that I have a huge soft spot for trucks and tractors. There is just something about these workhorse vehicles that really appeals to me and so when Trumpeter released the S-65 it certainly caught my attention. Apparently I’m not the only person who has more than a passing interest in these hulking tractors. Shortly after the kit’s release the MIG Productions forum began to organize the “Stalinez Smack Down” group build. The participant lists grew and soon the forum thread was full of reference photos and

|

|

|

|

|

|

|

|
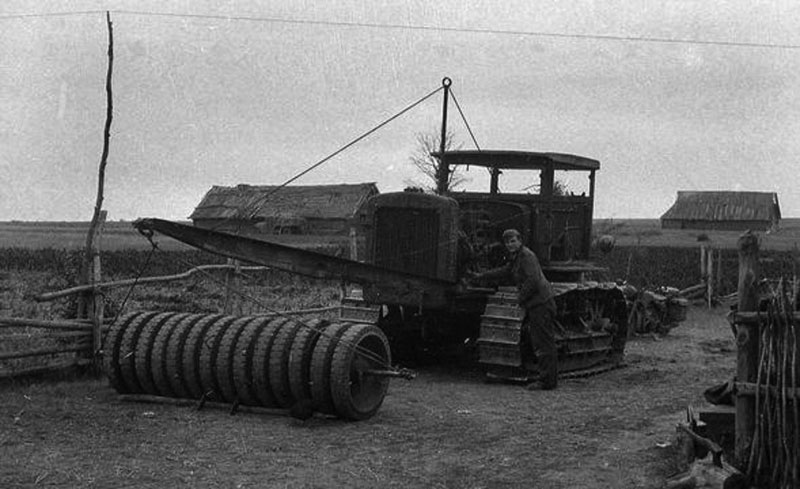
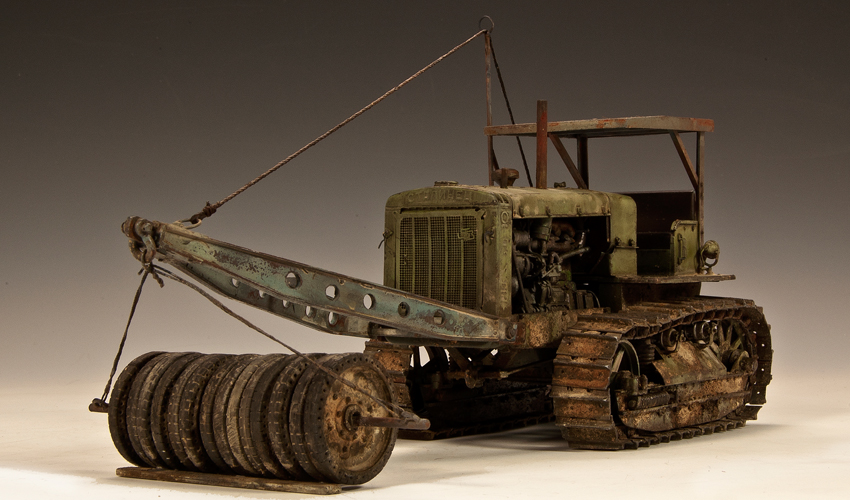
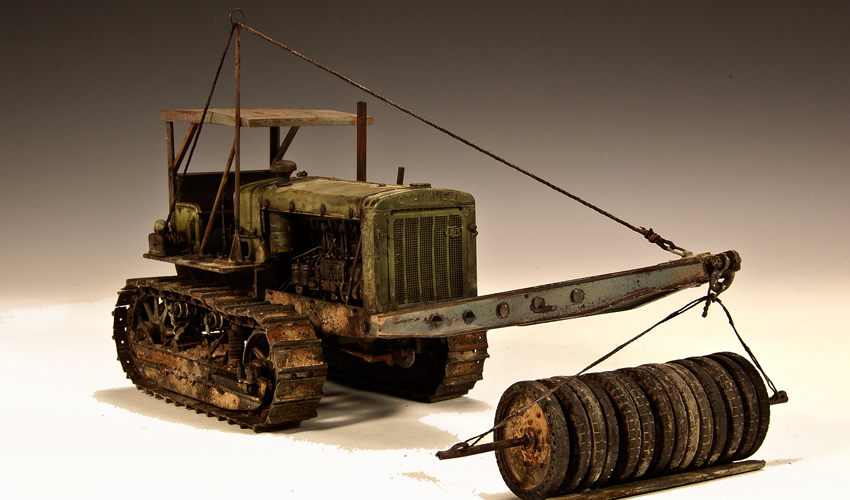
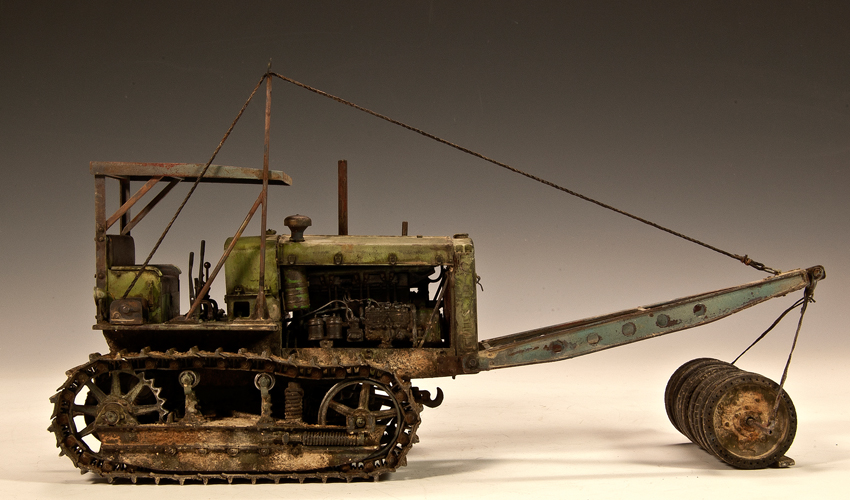
“Smack Down” talk. My resistance was low and it wasn’t long before I decided joined into the fun. A few mouse clicks later I had the Trumpeter kit along with the LZ Models engine and radiator upgrades on the way and within a couple of weeks my workbench was full of plastic and resin. During the course of sharing photos one photo in particular caught my attention. It was of an S-65 pressed into German service and it appeared as though they had mounted a field constructed boom to the front of the vehicle which then held a bar onto which a number (14) T34 road wheels. The boom and wheels are supported by an unlikely configuration of cables that run through a tall post and then somehow attached to the rear of the tractor. It was an interesting field modification that I’m still not really sure what it was for, but my guess is for some type of road work. This was my Smack Down vehicle!
The Trumpeter kit is molded in light grey plastic with the parts appearing with very little flash. The fit of the parts is generally very good and combined with the clear instructions and relatively few parts this is the type of project that can easily be constructed over the course of a rainy weekend. The kit, however, does have a few issues that you should be aware of. First, the front radiator contains a couple of spelling errors. The first error being the name CTAЛИHEЦ (Russian for STALINETZ) shows the English style “N” rather than the reversed looking “И”, with the same issue replicated on the lower radiator letters for the word “Diesel”.

|

|

|

|
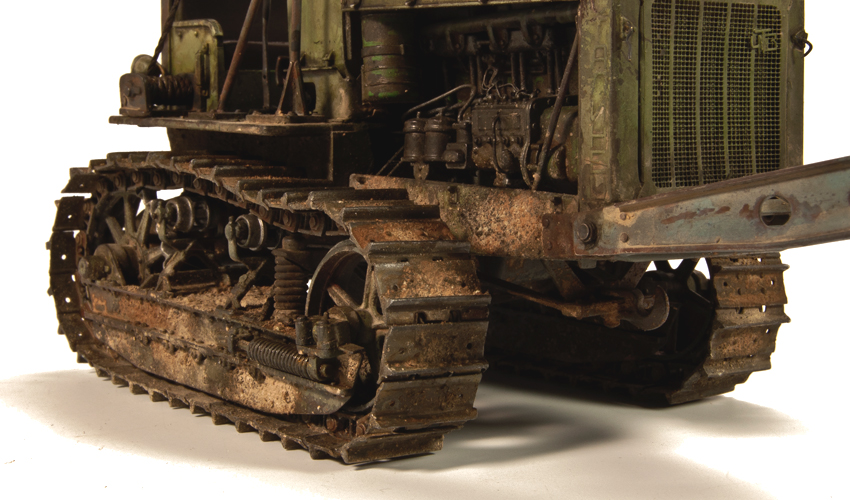
In addition to these errors the Trumpeter kit does have one basic short coming; it lacks an engine. This leaves the modelers’ only option to construct the tractor with the large side engine panels in place. The oversight is unfortunate as even a quick glance at period photos show that many of these service tractors where in use with the large side panels removed for increased engine ventilation. Luckily, Trumpeters omission has been remedied by Libor of LZ Models who quickly brought an excellent resin engine to the market. The LZ Models engine is nothing short of brilliant. The LZ parts are presented in light colored resin and the kit instructions come on a small CD that includes easy following step by step instructions and references. If that wasn’t enough, LZ Models also offers a replacement front radiator with the correct spelling and photo etched parts for the front mesh and tractor logo.
 I began my work with the LZ Models engine. I am familiar with the LZ Models brand and once again Libor has produced an excellent product. Getting into the relaxed nature of the group build I decided to have a little fun by first building a quick bench on which to hold my engine during construction. Once I unpacked the engine I was surprised by the size of this thing…it was huge! I decided to add a “worker” in some of the early photos just to add a sense of scale. As with all of the LZ range of products the instructions are presented on a small CD disc. The steps are clearly presented and a link to a walk around reference site is also included. I found this reference particularly helpful as I decided to detail the engine a bit by adding some wiring and extra plumbing just to make things looks a little busier. As the engine progressed there becomes a time where certain fittings and brackets of the engine needed to be fit onto the Trumpeter kit. So I cracked open the Trumpeter box to begin construction of the kit chassis. A few test fits confirmed that the LZ Models engine would fit perfectly onto the Trumpeter chassis. The LZ Models radiator and engine were permanently attached to the chassis without incident and it was time to move onto the next steps.

|

|

|

|

|

|

|

|

|

|

|

|
The tracks are offered as individual pads along with two separate inner brackets to form each link; 34 per side. These parts have quite a few attachment points and as such require a little extra time for clean-up. Once completed, however, you are rewarded with a pair of extremely nice, workable tracks. On the boogie sponson I chose to use only one side of the photo etched mud deflectors as provided by the LZ update set – if only for the sake of personalizing my model. The building of the tractor’s upper areas is a fairly straight forward affair and moves along quickly thanks for larger parts and clear instructions.
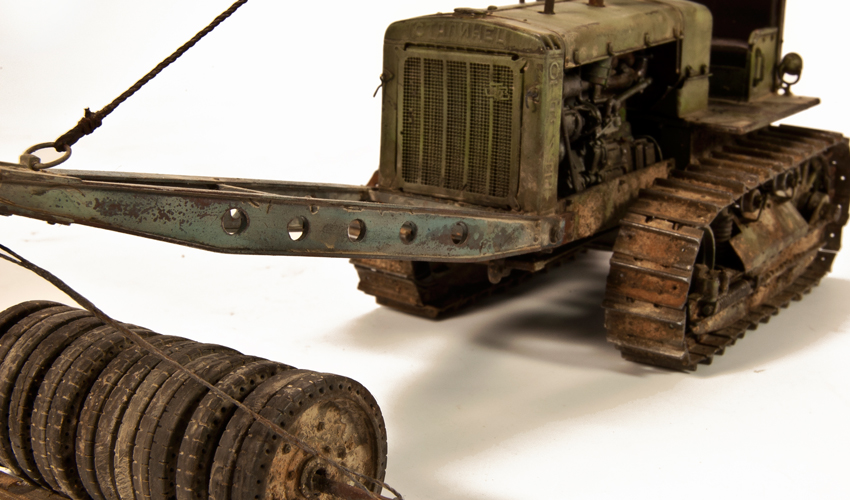
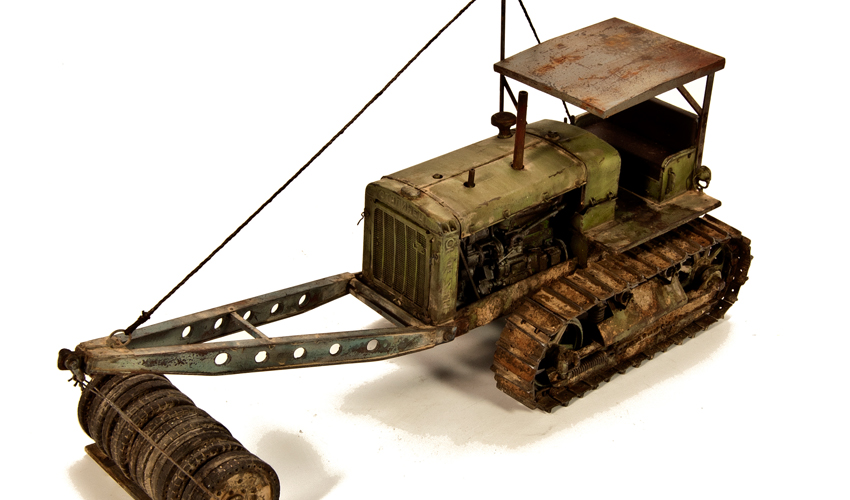
The primary focus, however, is the extended boom to the front of the vehicle. After a bit of head-scratching trying to figure out the exact arrangement of the boom and rigging I finally decided to just “wing it” using my best guesses based from the photo. From the reference it appears that the boom was made from found materials, perhaps even bridging joists. I decided to follow this notion and cut two shapes from plastic sheet, punched 4 lightening holes into each (improvised – not found on the photo) and then capped each edge with thin strip. A friend happened to have a set of T34 wheels from the Tamiya kit which I borrowed a pair and made multiple castings as seen in the reference photo. I debated on whether or not to construct the roof/cab as seen on the photo and in the end I decided to make a simplified version of the roof in keeping with the field modified nature of the project. I also debated whether or not to show the engine totally exposed, or to install the top of the hood. Finally, I decided to install the hood as I felt that the totally exposed engine would draw to much focus from the viewer and I preferred to have the focus drawn to the front boom.
 Painting and weathering. Often people view my work and tell me that they can tell it’s my work even before they see my name. Perhaps they are just “blowing smoke”, but if it’s true then it a huge compliment to me. But, it got me wondering what exactly does make up my style? If we start with the premise the most modelers are using basically the same materials and know the same techniques and tricks, then what might set my work apart? The accompanying photos will show the basic steps that I take when painting and weathering. My guess is that most modelers will recognize the techniques as most are fairly common practice these days. So, then what might I be doing differently?
Here are a few of my thoughts: First, I work very quickly. When I paint and weather I move from one step to the next in rapid succession. Honestly, except for the drying times of the oil paints I could often finish the painting and weathering of my pieces in a matter of hours. I don’t labor over the small details. I liken my technique to sketching, rather than drawing. I am more concerned about capturing the mood and atmosphere rather than capturing each and every small bolt and buckle. Maybe it’s simple laziness on my part, but I feel that the quickness can translate to a certain vibrancy or energy in the finished presentation.
   |

First, I realize that color modulation is all the rage these days. I have used it and I can see the validity of the technique for producing eye catching results. However, with so many modelers following suit these days I feel that the technique and results have become somewhat predictable. I see that the same surfaces are highlighted, the same fittings are exaggerated and the same look is found on many models. Please don’t get me wrong, I am not trying to be critical of Color Modulation or the models presented using the technique. What I am trying to say is that perhaps there is a way to take the certain aspects of Color Modulation and perhaps incorporate them in a new ways. So what do I do differently? I believe that the majority of my finished appearance begins with my early base colors. You will notice from the accompanying photos that my base colors are more varied – or random in application. I do use shadows and highlights (similar to modulation) but my patterns are not necessarily tied to the rules of modulation. For instance, my highlight tones are not always found on the upper, leading edge surfaces. There are times that I will apply the lighter tones on lower or recessed surfaces just for the sake of breaking the rules. From the accompanying photos you might also notice that the green vehicle base color is actually a comprised of varying shades of green. It’s all about the multiple layers and subtle shifts of color over the entire model with the point of view not always consistent with the rules of Modulation or a Zenithal light source. The instances can be subtle, but I feel that the overall accumulation of these small “rule breakers” can bring an added level of visual interest to the finished piece.
The second point is that I am not overly concerned that the green color(s) completely covering the oxidized reddish colors underneath, especially on the lower sections. The incomplete nature of this layer is somewhat contributed by the speed at which I work, but the results are intentional. It’s really about the “happy accidents” at the early stages. I have learned from experience that the more interesting that I can make my early base layers then the more interesting (and pleasing?) the final results will be. So, with this in mind at this stage I am really not overly concerned about complete and even coverage. Taking this a step further you can see how the hairspray technique fits perfectly into my style of work as I am able to further manipulate the base layers through the “random” removal of paint.
And finally, it’s all about the oils baby! Once I have achieved a random base surface – some might call it a mess! – I need to bring it all together. The Magic really happens during the finish work done with the oils. The subtle color shifts and blending that the oils can give you is what ties it all together. Keeping in mind that I use the variations of the base finish to key off of – these are my “points of interest”. What I mean is this; if I have produced some random little patch of oxidized surface either though an uneven application of paint or chipped off via the hairspray technique, I will use this as an opportunity to enhance, refine and create a visual interest point. With this in mind, you can see how this ties in perfectly with my earlier steps (quick, random base application) as now I have a lot of small “points of interest” which to play with.
    |
What I hope is that in the end my result is a piece that is interesting to look at but doesn’t seem exaggerated. I strive to keep the viewer’s eye moving from one interest point to the next, one highlight area to the next, one chip to the next scratch. All the while I am trying to balance the result between artistic expression and realistic finish.
—————–
 As a final postscript – since completion of this project I was contacted by the video tutorial company, Miniature Mentor. The folks there asked if I would be interested in recreating this project for a full length video tutorial. The past spring, 2013, I traveled to Toronto, Canada, where I spent about a week building and painting the model before the camera. The tutorial video is a long format, lasting approximately 6 hours and covering all aspects of the build, from opening the box through the final touches. The video has now been released and is available through Miniature Mentor. (Scroll to Bottom of Page).

Hi, I think this was for clearing the path from mines.