
Diamond Reo – In the Rough
 The following article is excerpted from Issue 3 and Issue 4 of The Weathering Magazine. Issue 3 was my first collaboration with the magazine – The Chipping Issue. The feature article was this Diamond Rio truck on which I demonstrated techniques and thought about how to simulate wear and tear on newer, composite type vehicles.
Many newer vehicles have bodies made from composite materials that do not rust, yet the paint may still wear and chip. In this article we will apply our chipping techniques to a modern Big-Rig tractor in order to achieve a worn, well weathered appearance. For our demonstration we can imagine a long-haul truck that has driven many thousands of highway miles. Over time the effects of road grime, sun, road salts and weather have taken a heavy toll on the finish of our truck. Eventually a mechanical problem has caused our truck to be retired off of the road where it sits forgotten, parked behind the mechanics shop.
![]()
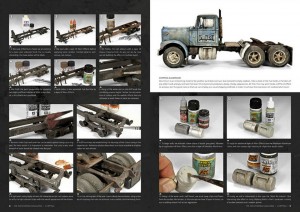
- Using solutions such as AK Chipping Fluids or hairspray can be a very effective method for creating realistic paint blemishes and wear. Before beginning, it is important that we carefully consider the results we are trying to achieve. In the case of the truck chassis we are looking for a basic dark colored finish that is visually interesting. Our base color will be black.


- We will strive to build visual interest by creating layers. Here we see a layer of Worn Effects solution is applied over the black base color. The chassis is made from iron so it is appropriate to show some signs of rusting. A quick application of rust colors is followed by another layer of Worn Effects Solution.
- We finish the paint preparation by applying two slightly different shades of black to our chassis (Dirty Black & Dark Black), each color separated by a layer of Worn Effects. The chipping of the two black colors will create a scuffed appearance. To review, we have applied a base color of Black, Worn Effects, Rust Colors, Dirty Black Color, Worn Effects, and Darker Black Color.
-


Using a little water and an old stiff brush the scrubbing process begins. Notice the nice variation of color and the realistic effects that are achieved as small flakes of paint are removed. You can see quite clearly in this photo how effective using the two black colors are in achieving a worn, faded appearance.


- Random small chips and scratches can be easily applied by using a scouring pad. For best results it is important to remember that only a light amount of paint should be loaded onto the pad. Too much paint will produce rounded blobs, not sharp edged scratches. (photo #8)
- Scuffs and chips are added along the top edge of the chassis using a fine tipped brush. Reference photos show that these types of scrapes are revealed as a lighter color on real vehicles. (photo #10)
- A light wash using highly diluted AK Interactive acrylic rust colors sever to unify the light colored chips with the overall chassis appearance. (photo #11)
- As this photograph of the rear chassis clearly demonstrates, using variety of chipping methods can produce a very realistic, interesting finish. (photo #11a)
As mentioned in the introduction the key to realistic weathering is that the results must be based upon the real world. In the case of newer vehicles you will find that many of the vehicle’s components are fabricated from aluminum. Aluminum is an interesting material to weather as it does not rust, but instead it simply oxidizes. Take a look at the fuel tanks or fenders of any older truck and you will see that over time aluminum produces a dusty, chalky appearance. At first this might seem to be a difficult effect to achieve, but the good news is that we can employ our usual chipping methods in order to achieve the impression of oxidized aluminum.
- To begin, airbrush a base color of acrylic grey paint, followed by an application of Worn Effects and then a layer of Metalizer Aluminum.
- Apply an additional layer of Worn Effects over the Metalizer Aluminum color and then spray a light dusting of a light blue acrylic color.
 Again, using a little water and a stiff brush scrub away chips and flakes from the surface. Remember, in this example we have 3 layers of color (grey, aluminum, light blue) so our scrubbing should not be too aggressive. In the end we want to have certain areas that still maintain the light blue color on top, in other areas the aluminum will be exposed while other areas have the paint removed all the way to the grey base color.
- Finally, a light wash using a lighter colored wash, in this case the AK 093 Wash for Interior color. One interesting side effect of using chipping fluids is that it produced a variety of surface textures. In the example of the fuel tanks we have the slightly porous texture of the acrylic paints along with the smoother surfaces of the aluminum finish. A light wash over the surfaces not only helps to unify the finish, but the liquid acts upon the different surfaces textures resulting in a realistic patina.
- The tractor cab and hood presents another opportunity to show wear and weathering of a non-metal finish. Most modern trucks have bodies made from plastics and other composite materials. These materials do not rust, but rather over time their finish may flake off or chip or the paint will fade exposing the underlying primer and composite colors. To begin the work on this area we first apply a grey color to represent the composite material followed by a layer of Worn Effects.
- A second layer of paint representing a white paint primer color is applied to the surfaces. This is once again followed by a layer of Worn Effects chipping fluid.
 The blue body color is applied in a light, random cloud pattern in alternating shades of light and dark blue. An initial round of chipping is performed to set the stage for the final chipping that is to follow. A toothpick can be used on certain areas to promote the chipping process.

- Emphasize chipping along the door edges and panel lines reflect observations made of real life vehicles.
- The traditional chipping method of using a stiff brush and water is an effective method for producing chips and flakes over larger surfaces.
- Overall paint wear and fading can be replicated by scrubbing the surfaces with a gentle abrasive pad.
- Paint chips and peels can be easily expanded using the primer colors and a fine tip brush.
- Once the chips have been created, the next steps involve unifying and adding richness to the surfaces. One effective method for doing this is the application of artist’s oil paints where various colors are applied and then worked into the surfaces.
Issue 4 of The Weathering Magazine focused upon Engines, Grease and Oil. The engine of the Diamond Rio was used as one of many short articles with this theme. The following is taken from Issue 4.

|

|

|

|

|

|

|

|
In the prior issue of The Weathering Magazine I focused upon the exterior painting and weathering of the Diamond Reo truck. Now, it is time to turn the painting and weathering attention to the heart of the big rig, the big Cummins diesel engine. The engine in this example has had a long service life and it is certainly in need of an overhaul; tired gaskets and fittings allow engine fluids to leak over the engines surfaces.
In the prior issue of The Weathering Magazine I focused upon the exterior painting and weathering of the Diamond Reo truck. Now, it is time to turn the painting and weathering attention to the heart of the big rig, the big Cummins diesel engine. The engine in this example has had a long service life and it is certainly in need of an overhaul; tired gaskets and fittings allow engine fluids to leak over the engines surfaces.
- The engine is first painted overall with Steel Metalizer paint. Afterward, a layer of Heavy Chipping fluid is applied followed by the trucks exterior blue color. A quick pass with a damp brush produces a realistically worn finish.
-


Highly diluted acrylic paints are bushed over the surfaces to unify the finish and to produce a faded paint appearance.
- A variety of darker color Effects are applied to the engine to bring out the surface details and lay the foundations for grease and grime effect that follow.
- Engine Oil Effects are applied around fill caps and fittings. The glossy finish gives the appearance of more recent stains.
- The trucks diesel engine installed onto the truck chassis. The grimy looking engine fits in nicely with the overall worn appearance of the trucks exterior.


Fuel Stains –
- In real life stains are generally created over long periods of time – diesel mixing with the dust and dirt of the road. In a similar manner, the fuel stains on the trucks tanks are created by many subtle layers of Washes and Effects, which over time combine to create deep, rich stains.
