
The Germans withdrew from the area in October 1944 and Croatia was reconstituted as part of the new Yugoslavia, now a socialist republic under Tito’s leadership. Croatia became one of the six constituent republics of Yugoslavia (the others being Bosnia, Macedonia,  Montenegro, Slovenia, and Serbia). During Tito’s reign nationalist sentiments were repressed, especially among the Croats. A decentralization program went into effect in 1970 but it did little to pacify Croats. With Tito’s death in 1980, Croat demands for independence only increased but it was not until the fall of the Berlin Wall that things began to come apart.
The fall of communism brought uncertainty to Yugoslavia in 1990. It encouraged nationalist sentiments in all of its republics. In Croatia, the elections produced a massive victory for Franjo Tudjman and his nationalist Croatian Democratic Union party. This group had proclaimed its aversion to both the ethnic Serbs living in Croatia and those living in Serbia. The move was spurred largely by the election of Serb nationalist Slobodan Milosevic as Serbian Communist Party leader. Milosevic’s rhetoric and repression of the Albanian population in Kosovo frightened the other republics.
The nationalist fervor in Croatia led to great tension among Croats and Serb ethnic groups, who still held centuries-old prejudices against each other despite living together under communism. Ethnic Croatian Serbs, in particular, feared the reincarnation of a pro-Nazi Independent State of Croatia. Similarly, Tudjman and other Croats believed that the Serbs held designs on incorporating Croatian territory, particularly the region of Krajina, into a “Greater Serbia.”

|

|

|

|

|

|
The tension and bickering between the two republics eventually led to sporadic fighting in Croatia. In 1991, Serbian separatists in Croatia began a series of attacks on Croatian police units, killing more than 20 by in the first four months. That May, Serbia upped the ante by blocking the installation of Stipe Mesic, a Croat scheduled to be the chairman of the rotating presidency in Yugoslavia. This maneuver technically left the Yugoslavia without a leader. In June 1991, Croatia struck back declaring their independence from Yugoslavia.
Full-scale fighting between Croats and Serbs occurred almost immediately, with Yugoslavia’s mostly ethnic Serb military backing the Serbian separatists that were fighting in Krajina. Serbian expansion came quickly, as Yugoslav planes strafed and rocketed Croatian villages while insurgents overtook Kostajnica. By the end of 1991, the Serbs had gained control of nearly one-third of the country.
In January 1992, the United Nations was able to administer a truce between the two sides and sent in a peacekeeping force, UNPROFOR. At the time the agreement went into place, the Serbs held roughly 30% of the former Yugoslav Republic of Croatia, and the UN agreement froze this status quo, which also left many Croatians as refugees from their homes in the Republic of Serbian Krajina as part of Serbian ethnic cleansing. There were reports of homes being looted and burned, as well as other atrocities committed against Croat civilians. Ancillary to the agreement the United Nations and European Community recognized Croatia as an independent state in January of 1992. United Nations peacekeepers, had difficulty disarming combatants inside the internationally protected areas set up under the agreement.
As tensions continued to smolder in Croatia in mid-1992, an all-out war broke out in neighboring Bosnia between the republic’s ethnic Serbs, Muslims and Croats. The Bosnian conflict drew in participants from all sides, including Croatia, which backed the Bosnian Croats in their fight mainly with Bosnian Serbs but also in sporadic conflicts with its supposed ally, the Bosnian Muslims. In late 1992, Croatian army forces began attacking Bosnian Serb communities in southeastern Bosnia Herzegovina, unraveling a Bosnian-declared cease-fire. Croatian army forces would later break Croatia’s one-year-old cease-fire as well in January 1993, crossing a U.N. dividing line and attacking Serb-occupied territory in Krajina.

|

|

|

|

|

|

|

|

|

|
The Croatian assault brought a brief return of combat, but not a complete resumption of the all-out war that was seen in 1991. There was actually a lull in Croatia for several months into early 1994 as the U.N. peacekeepers monitored the positions of Serb and Croat army forces. In March, Croatia and Serb rebels signed another cease-fire. The agreement was that both sides would withdraw their fighters away from a 600-mile confrontation line running down the middle of the country. The cease-fire would prove fleeting as the fighting in Bosnia once again tempted the Croatian army
In late 1994, after Bosnian and Croatian Serb insurgents joined forces to launch an attack on the Muslim enclave of Bihac (located across the border from Serb-occupied Krajina), Croatia announced that it would enter the Bosnian conflict to support the Muslims. Croatia’s pledge to intercede in Bosnia was not unexpected, given an early 1994 deal in which the Bosnian government and the Croatians agreed to combined efforts to fight the ethnic Serbs. Croatia had an added incentive because of Bihac’s proximity to Zagreb, the Croatian capital, which Croatian did not want to see Serbs near.
At first the 1994 Serb attack on Bihac produced only skirmishes between Croatian army forces and rebel Serb forces in nearby Krajina, as the Serbs tried to cling to their gains from 1991. Having spent an estimated $1 billion to upgrade its military the since 1991, Croatia began to gain the upper hand by mid-1995. Croatia launched several offensives in 1995, re-capturing a 200-square-mile area of Krajina from the Serbs in May. Then in July, the Croats sent several thousand troops some 50 miles into Bosnia, a maneuver that cut off a key Serb supply route to Krajina.
In August 1995, the Croatian army launched a full-scale invasion to recover all of the Serb-held areas in Krajina. Some 200,000 Serbs fled to Serb-held areas of Bosnia or to Serbia, as Croatian troops quickly reclaimed rebel strongholds such as Knin, and other cities. In under a week, Croatia claimed triumph in its battle to recover Krajina. Croatia’s victories in Krajina and Bosnia helped generate momentum toward peace talks for the Muslim republic, with the foreign ministers of Bosnia, Croatia, and Serbia (representing the Bosnian Serbs) agreeing to the underlying principles for an arrangement by September. During that period however, Croatian soldiers continued a campaign of terror through Krajina, burning and looting property and engaging in mass killings of ethnic Serbs. The Dayton agreement reached in November 1995 brought a general peace to the region, with mass violence by Croats against Serbs generally halting by the end of 1995.
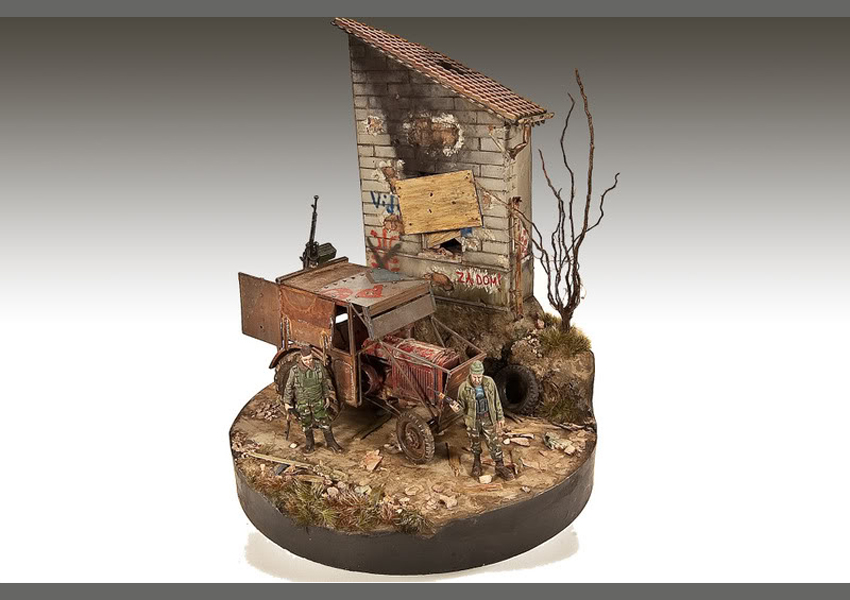
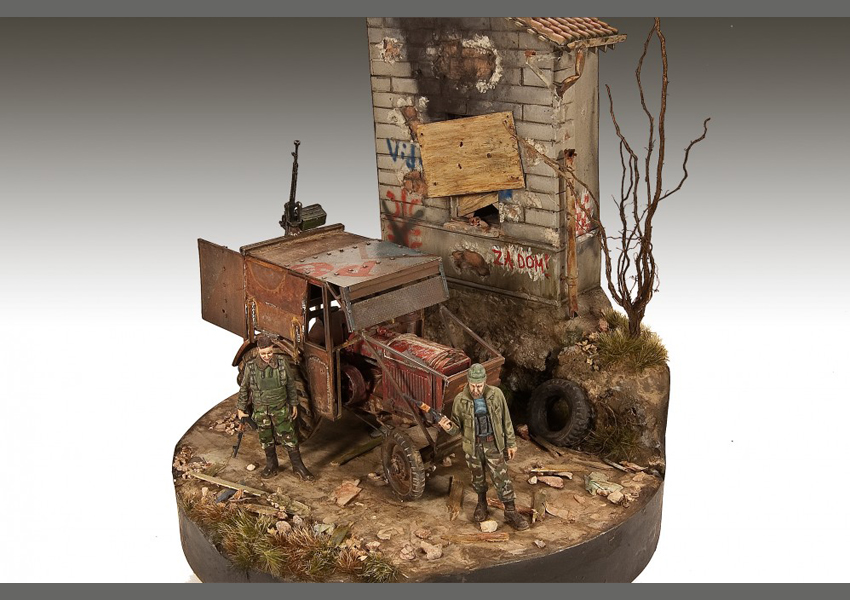
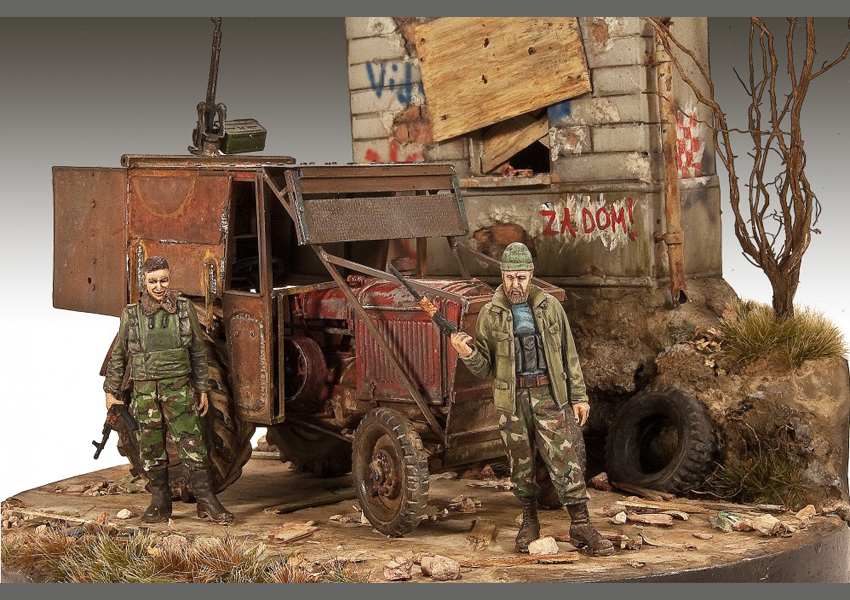
It is said that a picture is worth a 1000 words – and this may be true – pictures are certainly a great source of inspiration for modeling projects. This is certainly the case here. The inspiration came from a photograph of a farm tractor complete with armor and 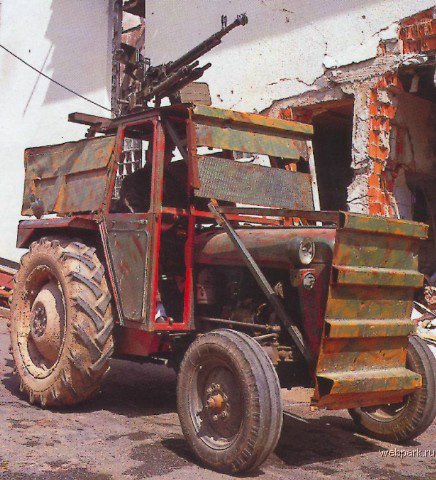 a mounted 12.7cm DShK gun. The photograph had no tags and gave no indication as to the context of the vehicle. But, it was cool looking and that was good enough for me! Later, once I began posting my work in progress photos on a modeling forum a modeler from Croatia was able to identify the vehicle and give me some background information. As he explains, the Croatians, especially during the early stages of the conflict had very little in terms of modern military hardware. Being resourceful the locals made due with what they had on hand – including farming vehicles – to cobble together a fighting force to withstand and eventually defeat the Serbs and Yugoslavian army’s.
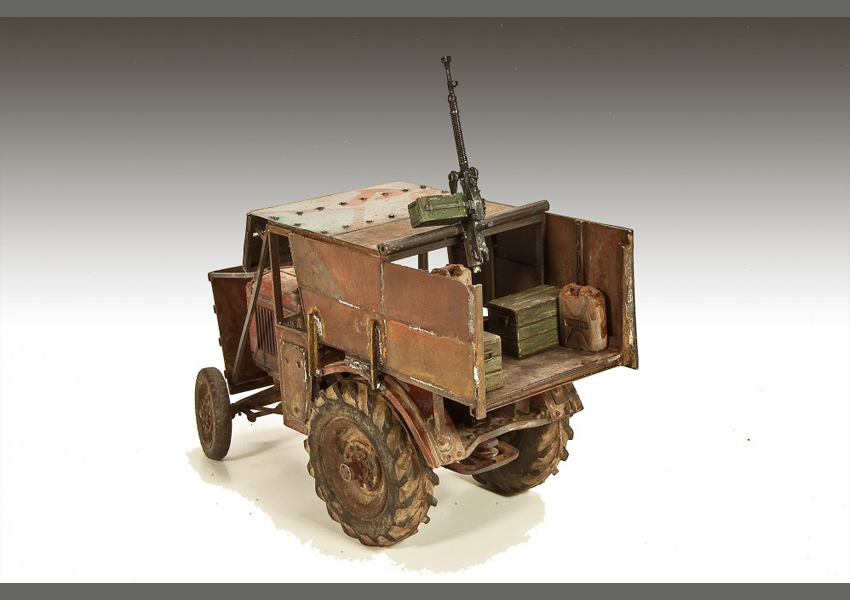
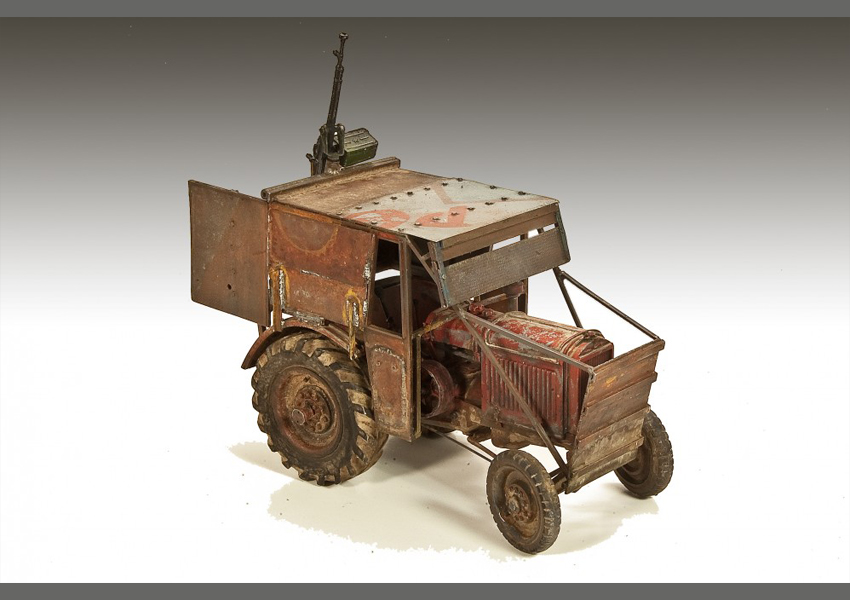
The first trick was finding an appropriate farm tractor in 1/35th scale. After a couple of evenings of internet searching I came across the MK35 Editions page which had a nice looking tractor kit. I placed my order with the French manufacturer and within a very short time it arrived at my doorstep. I realized, of course that the tractor in the photograph and the kit tractor were two very different vehicles, but that didn’t matter to me. My intent was an “inspired” build – not a picture-perfect scale reproduction.
I began construction of the tractor began on a rainy Sunday morning; the kit was completed by that same evening. This is my first experience with an MK35 Editions kit and words cannot express how nice this model was to build. The casting of the parts is flawless – and the fit rivals that of styrene. A small photographic instructional booklet clearly shows the construction sequence – one part, one photo at a time. All-in-all there are some 45 parts to the assembly, a relatively low number which makes this a perfect weekend project.

|

|

|

|

|

|

|

|

|

|
Ok, let’s move this tractor from the farm yard to the front lines. Looking at the original photos it appears that the basic tractor is a closed cab machine, with the extra armor simply welded or bolted onto the frame. Since my tractor was a sporty cabriolet I would need to build a framework for the applied armor. Using the photos as a pattern guide I used plastic strip to replicate the general shape of the structure. It also appears that the “armor” is really nothing more than scraps of sheet metal. I decided that the protection on my tractor would be a little more substantial and opted have my tractor adorned with cut steel plates made from plastic stock. The bits and pieces of etch, including the tread plate patterned visor are from my scraps box. As you can see from the accompanying photos i build the frame/armor as an independent assembly, unattached from the tractor itself. Once the tractor is painted the framework is designed to simply slip onto the tractor. My pattern for the framework was mostly a matter of speculation and test fit, hoping that in the end it would somewhat resemble the reference image. The 12.7cm DShK gun, along with the water cans in the rear of the tractor came from MIG Productions. Over the cab I decided to pay homage to the sheet metal armor in the original photo by adding a sheet metal sign as the roof. To add a little visual interest I made a quick stencil using the letters “P” and “e”; for no particular reason. Later, my modeling adviser from Croatia congratulated my on my lucky choice of letters telling me that these letters were the first letter of the word “Pekara” which translates to Bakery. Fine by me…a bakery sign it is. Thewelds along the plates have been made from stretched sprue and 2 part epoxy, and then painted with Reaper Miniatures Pewter color simulating relatively fresh welds. These weld colors would need to be refreshed a number of times during weathering to maintain their luster.
In all honesty one of the major reasons I was attracted to this subject was for the painting and weathering. The well-worn tractor, the scuffs and chips, metal finishes, rust, dirt and grime….I knew that this could be an incredibly fun challenge. There was little doubt that the “hairspray technique” would play an important role with the finish of this project….particularly the tractor itself as the reference photo showed a vehicle that was highly worn, lots of paint peels and chips.

|

|

|

|

|

|

|

|

|

|

|

|
The hair spray process began with the underlying grey “primer” color using Tamiya paints. I sealed this layer with a light layer of Future floor polish, followed by another layer of hairspray. As an aside, until this project I had used the least expensive, non-brand of hairspray on the shelf. I figured that hairspray is hairspray and what’s the difference? This time I tried using the brand TRESsemme’ hairspray and was quite surprised by how much of a difference it made. Maybe not all hairspray are created equal? It seemed as though the flakes came off more easily in more uniformed sizes; basically I felt as I had better control of the process. Once the hairspray layer had dried (about 1 hour) the tractor was painted using Tamiya Red with a few drops of Buff added for a faded effect. Finally, using a small stiff brush and water I went about scrubbing off flakes of the red paint to reveal the grey primer underneath.
A healthy round of MIG Productions 502 Abteilung artist’s oils brought out the details and laid the foundation for continued weathering later on. Working with the artist’s oils is probably my favorite part of the finishing process. The oils really bring a strong level of depth and richness to the finish. I begin the weathering of the tractor by applying MIG Productions Abteilung Shadow Brown directly into all of the nooks and crannies of the vehicle. Then with a soft brush I feathered the paint and removed any heavy, unnatural accumulations. Although a somewhat subtle effect, I feel that this is an important step in creating a certain weight and depth to the final presentation. At this point the model is set aside for a time to allow the paints to dry completely.
Moving onto the armored framework I basically followed the same painting techniques as I had used on the tractor. The work on the armor began with a nice base color layer, in this case bluish steel color. Repeated layers of hairspray and paint (bright orange, red, yellows, and blue) were added and then scrubbed off which resulted in a rich, organic foundation of textures and colors. Experience has shown me that it’s better for the colors to be overly bright at this stage as they will tone down significantly during the subsequent finishing steps.

|

|

|

|

|
|
|
Once I had finished laying the foundation colors using the hairspray techniques I return to the more “traditional” weathering methods. I first began by applying filters using Vallejo acrylic paints. The consistency of these filters is not much more than colored water, but they are very effective in enhancing effects of the hairspray foundation. I tend to work very quickly during this stage; at times applying a second filter to an area before the first layer has had time to dry. These “wet on wet” applications can also produce some interesting effects. Once I am satisfied with this step I apply another light misting of Johnson’s Future to seal the acrylics one last time before moving onto using artist’s oils. Adding another layer of Future is totally a matter of personal preference. I do it because of the porous nature of the acrylic paints which tend to easily “stain” when applying the artist’s oils. This final layer of Future helps to avoid “hot spots” and also allows the oil colors and thinners to more easily move over the surfaces. Thewelds along the plates have been made from stretched sprue and 2 part epoxy, and then painted with Reaper Miniatures Pewter color simulating relatively fresh welds. These weld colors would need to be refreshed a number of times during weathering to maintain their luster.
Once dried, I return to the project using more artists’ oils, this time in the form of dot fading. In the case of the steel plates In the case of the steel plates I used a number of red and rust colored paints, but also did not shy away from applying spots of blues and yellows. The dots are applied to a surface that has been pre-moistened and are worked into the surface using a larger, soft brush; downward strokes on the vertical surfaces and more of a swirling motion on the horizontal surfaces. The idea is to create subtle, tonal variation to the base color which helps to add to the visual interest of the model. In contrast to using the acrylic paints, each oil paint application must be allowed to dry completely before revisiting an area otherwise you can easily end-up with a brown/grey mess rather than clean, bright colors. A hairdryer is a handy tool during this stage. To the lower chassis and around the wheels and engine earthen colors of artist’s oils were used to provide a dirty, grimy base for additional weathering.
There always reaches a certain time during the painting process when I realize that the paints and oils have reached their functional limits: the appearance that I am after just cannot be achieved by doing more of the same. It’s at this point that I incorporate pigments into my weathering mix. I think of the pigments more as an extension of painting, rather that a separate material. With that thought in mind I nearly always dissolve my pigments in thinner and apply them wet by using a small brush. On the upper armored surfaces I used the pigments rather sparingly. I applied “washes” of rusty/orange colors which I would “set” at various stages using MIG Productions Fixer. Fixing the pigments allows me to continue to apply additional layers of pigments and oils without fear of disrupting my previous work. The lower areas of the vehicle where also treated with pigments using earthen colors, however the application of the pigments was much heavier in order to create the accumulated dirt and grime build-up.
I should point out that my finishing process is by no means a linear path moving from acrylics to oils to pigments. Rather, it’s not uncommon that I will move from acrylics to oils, maybe add an additional acrylic filter, apply some pigments and then maybe come back with another application of oils.
Lay of the Land
I had intended from the outset of this project to include a scenic base. The problem was, however, I couldn’t decide what the scene should be. Initially I had decided to build a more or less urban landscape, thinking that it would make for an interesting juxtaposition between the farm tractor and setting. I began by constructing small, round base and 2 story building using styrene. By this time, however, I wasn’t particularly happy with the way it was turning out. The layout just wasn’t working in my opinion. I began to play around with different ideas – changing the base size, adding sidewalks – or leaving the building off completely. While I was messing with it I decided that I would try changing the height of the building – and make it a more rural landscape. I took my styrene building to work with me and cut it in half – now using only the top half of my original structure. To the base I added a small hillside, a ditch and a road. At this point what began as my home project became part of my job – I decided that I would make this base into a new kit release for Masterpiece Models. The next day or so (around my real work projects) I spent making mold boxes and pouring rubber – and finally resin.
 With the resin out of the molds it was time for paint. I began with a matte black primer over the entire base. I followed this by laying out the broad colors of the building and groundwork using my airbrush and combination of Vallejo and Tamiya paints. Vallejo Model Color Stone Grey was used for the building while Tamiya Flat Earth and Buff laid the foundation for the ground and roadway. A few days with the paint brushes were spent picking out, and refining the details of the building façade and grounds. The colors were unified using a series of light washes and filters using MIG Productions products. Pigments were used on the groundwork and for the smoke stain on the front of the building. I had noticed during my research that many of the buildings and ruins were “tagged” with graffiti and slogans. This, I thought, would be an ideal feature to add to my building. When you don’t speak the language this is a little easier said than done. I’m sure that you will notice the different manifestations that the graffiti took from the progress photos. Once again my Croatian friend was a big help to me in getting the proper words and tense.
The groundwork was completed by placing a few clumps of Silfor grass along with a small snag of a tree made with a root from my garden. Debris in the street was made from torn bits of tracing paper wetted with white glue/water and lightly colored with acrylic paints while the scraps of broken wood are – well, scraps of broken bass wood. Both of the figures came from the Warriors range and painted using Vallejo acrylic paints.
In all honesty I began this project knowing very little about the tragic events which took place in Croatia and the region during the 1990’s. And so, for me, the knowledge I gained while doing the research regardless of the model was quite fulfilling. Once again, MK35 Editions is to be congratulated for a very fine model of the farm tractor.
      |


Google for Ovchara or Srebrenica…
Amazing model…