
 Modeling, specifically military modeling is generally content on building all of the various machines and weapons of war. We take great care in our quest to build accurate, small scale representations of the tools of the trade and in some cases we combine these with figures to create small scenes. These vignettes and dioramas often portray a certain historical event – a roadside meeting or front line engagement. However, if we are honest with ourselves we must come to the realization that even our most accurate depictions of the tools of war only tell a limited part of a greater story that is warfare. Rarely do we touch upon scenes which depict the horror, tragedy and loss that war causes on the human level.
Is there a reason for this? Probably, but this is not the time or place for such a conversation. Rather, I am simply a modeler who has chosen as his subject the portrayal of a human tragedy of epic proportions.
The genesis of this idea took hold while visiting the United States Holocaust Museum in Washington D.C. This was my second visit to the museum, but the first time that I had taken advantage of the full tour. My tour began by being personally shown some of the museum artifacts by a Holocaust Survivor, his narrative intertwined with the descriptions of the museum pieces. His Story – Their Story; had a profound impact.

|

|

|

|

|

|

|

|

|

|

|

|

|

|
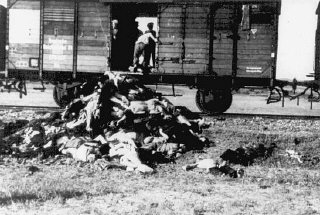
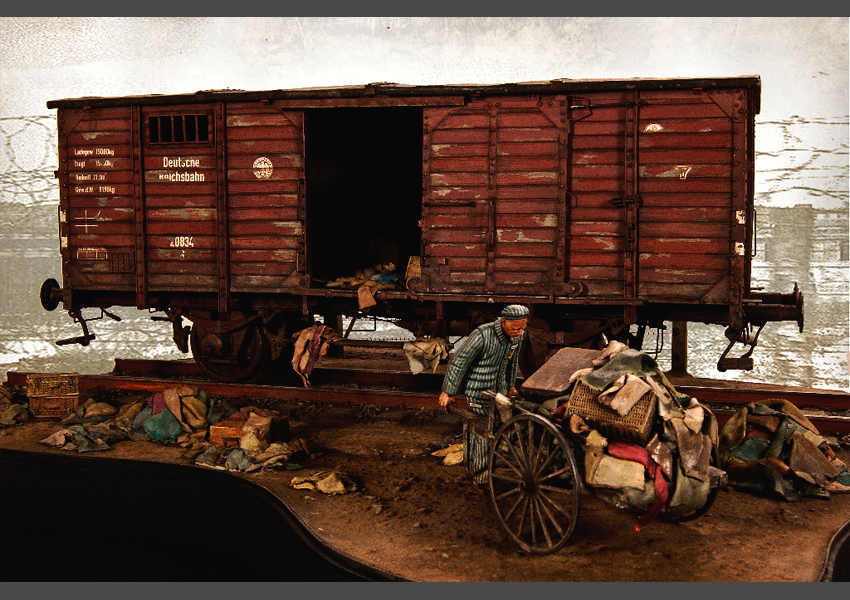
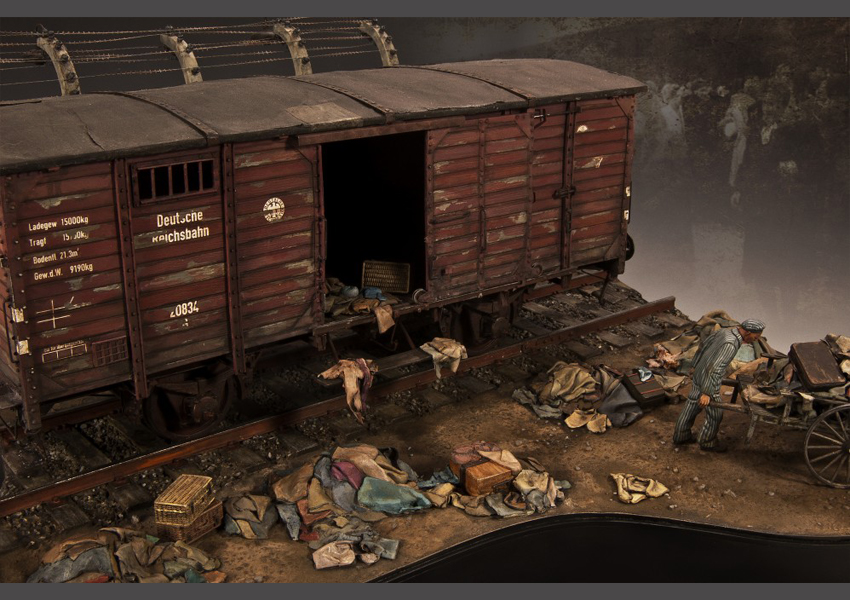
Among the symbols of the associated with the Holocaust, the German Rail Transport car, G-10, came to symbolize the forced “relocation” of millions of people during the Nazi reign. Until recently, 1/35th scale rail stock has been nearly non-existent. Fortunately a new entry into the model community, L.Z.Models, has filled this void with absolutely stunning rail car kits. The kit contains superbly cast resin parts, along with 180 photo etched bits and an extensive decal sheet.
Construction of the car begins with the underside supports and the car bed itself. The wheels and brakes are provided as resin parts, while a number of the fittings are presented as photo etched parts. Most of these photo etched parts are meant to be “double thick” – that is two pieces together to give the proper scale thickness to the part. I soldered all of the photo etched connections for added strength. If, like me, you have never really paid attention to the underside of a rail car you are in for a surprise. I had no idea that there was so much “stuff” tucked away down there. All of the various brake lines, cables, and plumbing are dutifully called for. A combination of plastic rod and brass wire are used for these components. Calipers and wire cutters came in very handy during this stage!
Moving to the upper side of the car, construction of the side panels is next. Once again the attention to detail is evident in the parts. Each panel is flawlessly cast with very realistic wood grain texture on both the outer and inner sides. The end pieces have small channels which make alignment of the corners a breeze. The only thing to watch for is that the panels have a definite top/bottom orientation – it’s easy to mix this up. Pay attention to the “metal” strip and place this edge up towards the roof line. I found this out the hard way, after I cut my window openings. The window for one side was at the floor…oops! Once I had realized my mistake I had two choices; either replace the side boards and blend them into the body, or, simply put a train yard patch on the side. Being a somewhat lazy modeler I choose to make a metal patch from plastic card. One section at a time the sides are attached to the bed of the car and for the first time I really get some perspective as to the size of this kit. Even at scale, trains are surprisingly big.
 The one area construction that presented me with some difficulty were the sliding door brackets. These are presented as photo etched parts in the kit. And although the instructions show this assembly from a number of perspectives I had a tough time making sense of exactly how some of the parts were to be shaped. Unfortunately though the trial and error process I made somewhat a mess of the photo etched parts. Taking a step back, I decided that it might just be easier to recreate the door tracks from styrene strip. This approach turned out to be quite a bit easier with good results.
The doors themselves are a simply elegant with their fine resin detail and photo etched fittings. The doors are fixed, but can be placed in the open or closed position. Again, alignment of the doors to the frame was very good with very little fiddling needed for the doors to fit onto the tracks. Each door has a header made from photo etch which spans the gap the width of the door. I found that I needed a little extra support on the open door side to maintain the alignment of the car’s walls. I did this by adding a section of square brass rod behind the open door header – out of view.
 With the bulk of the car completed the remainder of the construction centers around adding the myriad of smaller fittings and details which really bring the car to life. The roof comes in 4 sections that are glued together end to end to make up the length of the car. The joins were covered (inside and out) using plastic strip – small rivets were added using heads created from a punch and die.
The painting. I actually thought quite a bit on how I would approach the painting of the car and the entire scene. I thought about muted colors, heavy shadows; I even considered painting everything in grey tones as if it were a period black and white photograph. In the end, however, I decided that this was no time to get tricky and I would simply paint in My Style – whatever that is! As always, the process begins with a layer of primer. Next, I gave the car an additional “primer” of flat black. This is actually an important step in the overall finish of this car for a couple of reasons: First, I want to increase the depth of the shadows, especially between the planking and in the interior, and Second, for the overall exterior finish

|

|

|

|

|

|

|

|

|

|

|

|

|

|
I am going to depend upon a certain level of the Black to show through the color. I’ll explain later when I get to that point. Working my way from the bottom up, I first added colors to the underside of the car, wheels and trucks. I probably got a little fancier here than I really needed to be. I first painted the metal areas using Model Master Metalizer (Burnt Metal. Aluminum & Magnesium) and then sealed with a light layer of Future. Over this I applied a layer of hairspray and then Tamiya’s Nato Brown color. Once the brown had dried I removed patches of the brown color to reveal the steel colors underneath. In retrospect all of the fancy hairspray layers proved to be unnecessary as they were eventually covered by subsequent weathering.
Next, the base color(s). Since this was a rail car I figured why not use “real” railroad colors. So I went over to my Local Train Store and picked up a few bottle of POLLY Scale colors. Ok…remember how I painted a black undercoating? Well, here is when it comes into play. IF (big IF) I have developed a technique or “style” over the past years I think that can be traced to how I paint my base color(s) layer. In this case, I want a worn, somewhat transparent finish. I also try NOT to create a homogenous, or uniformed base color. I know from experience that the effects of the subsequent weathering will “play off” these inconsistencies. The technique is quick and somewhat organic – I welcome the “happy mistake”. If I can create a base color layer that is somewhat interesting – then I am confident that the later weathering will only enhance the visual interest.
Make sense? Probably not…but! Here’s what I did…..
Over the black I sprayed an inconsistent layer of POLLY Scale ATSF Red. Notice how the black color still shows through? These are the “happy mistakes”. From this point forward these inconsistencies will influence the final finish. Next, in order to enhance the planks and further enhance the visual interest of the base layer, I lightly sprayed UN-even applications of POLLY Scale Freight Car Red (a brownish color) using a piece of card stock as a quick mask along the planks. Again, the coverage is not intended to be a uniformed coverage but only enough to shift some of the color and tones. Looking at the base colors I am happy with the progress so far. I can see subtle shifts of colors, from brighter reds to darker browns, by using the card mask the wooden planking has some definition, and by adding a few drops of CSX Tan into my paint colors I have begun the weathering process with a little color fade.
If the base layer adds visual interest, then weathering certainly adds character to the piece. By the time I reach this stage, my mind – or mood – is certainly wrapped in the emotions of the setting; I am feel a certain sense of sobriety, or reverence toward the work. I want the rail car (and the entire scene) to reflect these emotions. I want the rail car to reflect the harshness of the events.
Paint peels and chips are created “the old fashioned” way; no fancy techniques here, just paint and a fine brush. Using Vallejo paints I spend several evenings adding small (and not so small) areas where the paint is gone revealing the worn wooden planking. I work quickly, moving from one area to another to help prevent repeating brush patterns. Along the way I take numerous breaks in order to evaluate my progress. My paint colors for the chips were based upon two colors: For newer chips I used a base of Iraqi Sand (819) to which I would add varying amounts of Field Blue (964) and Chocolate Brown (872). For older chips I used a base color of Deck Tan (988) to which I would add varying amounts of the Field Blue color and Black.
The kit comes with an extensive set of decals, enough for 3 variants including post war markings. These were applied after I had finished with most of the chipping over a thin surface layer of Future floor polish, and then sealed with another thin layer of the polish. I then re-painted chips over the decals in those areas where the decal laid over a previously painted chip. The roof was painted at this time as well, again using acrylic paints.
With the “basic” painting finished using acrylic colors, it’s now time to add some real richness and depth to the finish; for this I turn to artists oils. To the upper areas of the car (planking) I want to continue with the theme of enhancing the tonal interest. As you can see from this photo I chose a number of colors for this stage of the process; from reds, browns and yellow ochre. To begin, I first dab the oils 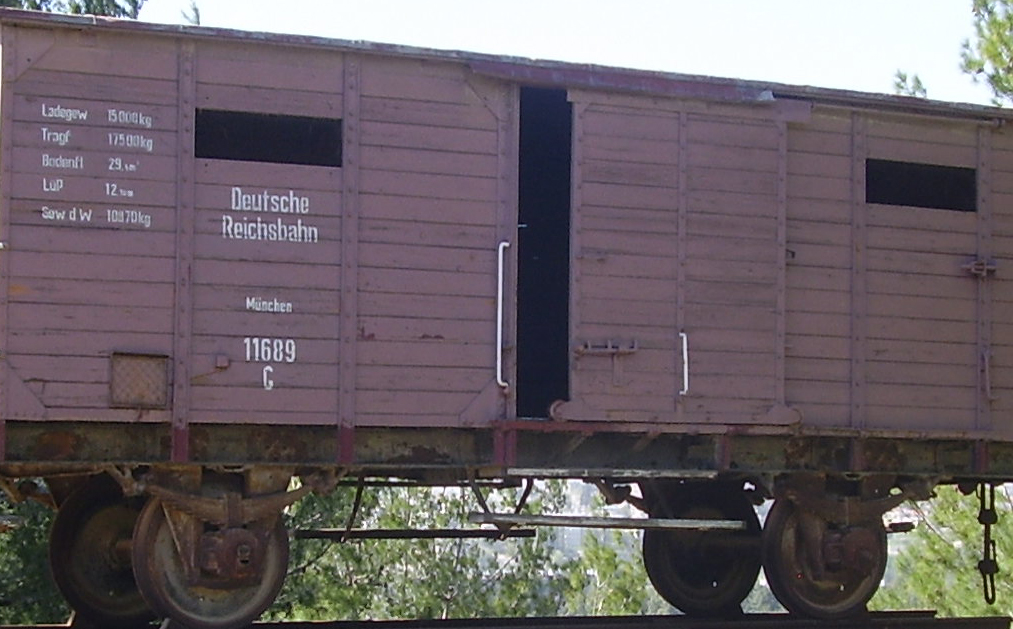 upon a small piece of scrap cardboard in order to leach out the oils – this helps quicken drying times and insures that the colors dry to a matte finish. Grime and dirt stains were added to the lower edges of the car, again using oils. The primary colors for this stage were 502 Abteilung Light Mud, Starship Filth, and Shadow Brown. In all cases using oils it is a process of building effects – layer by layer. Finally, the wheels and trucks received a “special” treatment of oils and pigments. Here, rather than apply each separately – or in succession – I apply the oils and pigments in one step. First, I dab oil colors onto the surface (wheel) – generally a mix of Shadow Brown and Dark Rust – and then using a a larger, soft brush I stipple the pigment colors (Rail Rust, Track Brown, Standard Rust) directly onto the wet paints. The pigments “stain” the oils and produce some nice nuanced effects. Once the oils have dried this application is permanent. The interior floor boards were given a wash of MIG Productions Weathered Wood – a very nice product that gives a worn appearance to the planking. At this stage I have done about as much painting and weathering to the car as I care to do at this time. The final weathering will be done as I assemble the scene.
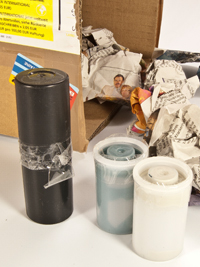
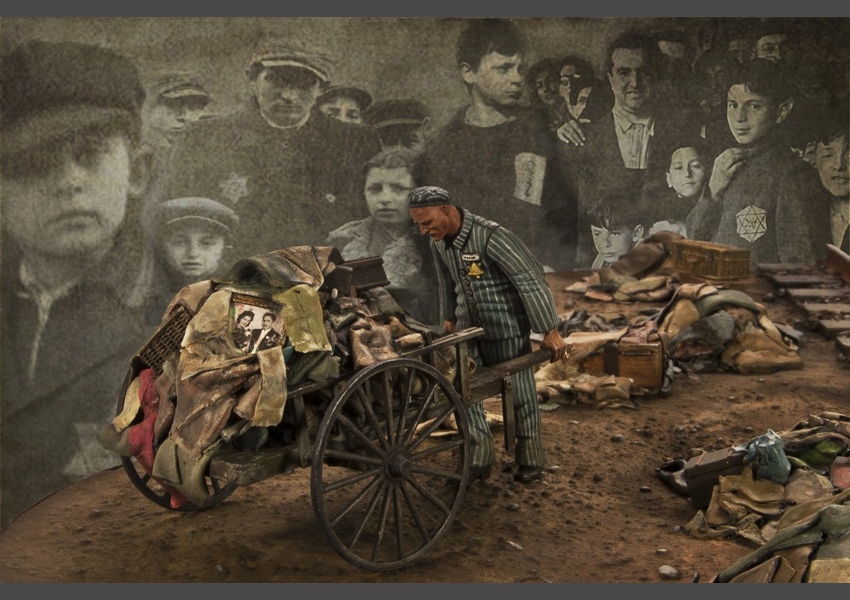
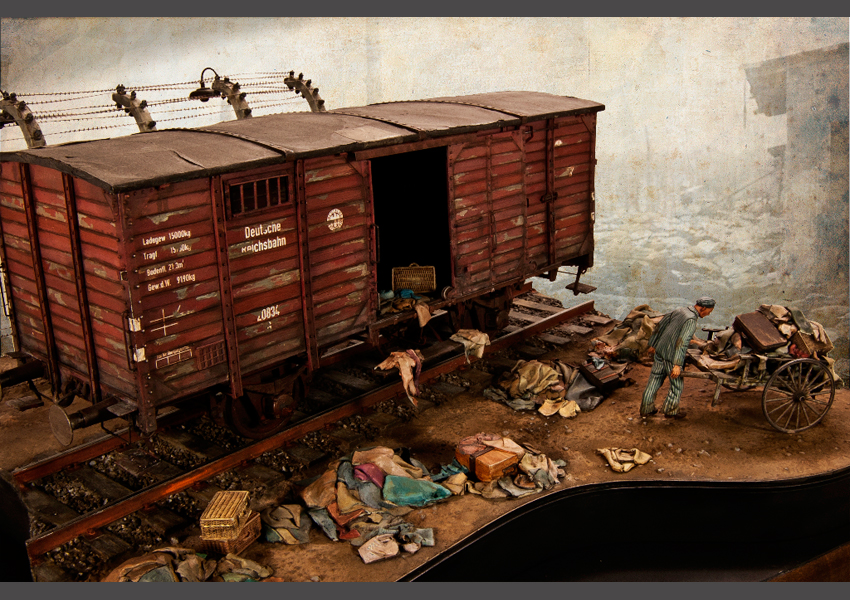
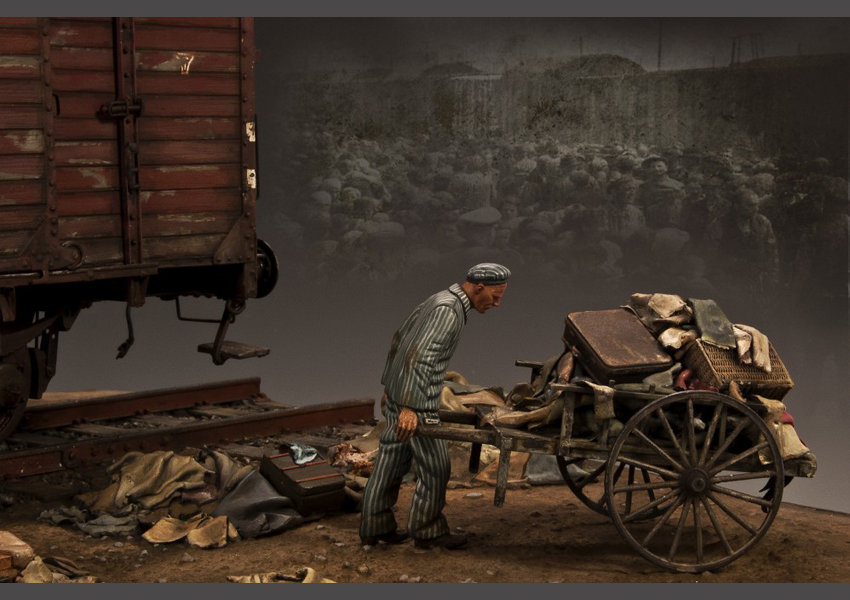
I knew from the outset that it would be a challenge to successfully tell the story. The story is simple; the scene would depict the immediate time just after the passengers had been off loaded. They were hurried off to their “destiny”, leaving whatever personal belongings that they had brought strewn about. This particular inmate is charged with collecting their belongs and taking them over to the sorting sheds. I am hoping to convey the isolation, despair and loneliness that this fellow must feel……he has no choice but to go about doing his task – day after day, train after train.
In order to convey this story I would need to pull out all of the stops when it came to the focal point – the prisoner figure. I built the small hand cart, but there was no doubt in my mind that I would need a custom figure, one specifically sculpted for this scene. For the figure I turned to a talented sculptor friend who was able to provide me with the ideal figure.

|

|

|

|
However, the story of the figure doesn’t stop there. As this project began to unfold I posted my work on some of the modeling forums. My good friend and excellent modeler Markus Lack saw these posts and sent me an email asking me about the project. The project was still in the early stages, but Markus had guessed the theme and sent me an email expressing his thoughts and asked if he could become involved. Markus (who is German) explained that in Germany it is still difficult to talk openly about such events that took place during World War II. Certainly the Holocaust is difficult subject to discuss, let alone represent in scale in any country, but particularly in Germany. It was an easy decision on my part to ask Markus to paint the lone figure.
As of this writing (9/11/11) Markus has just received my package containing the figure and is set to begin his work. I will include his update information and photos as his work proceeds.
Well, as we can see from this next set of photos about a week has passed and Markus and has begun working with the figure.
 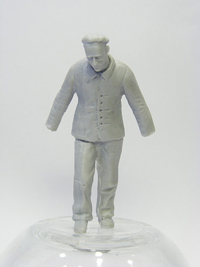 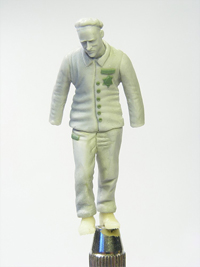   |

I will let Markus explain: ” When I received Ricks copy of the figure I´ve seen that it was pretty nice, but I knew that I could (and should) improve it before painting.
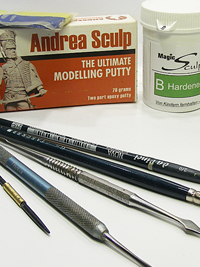
So, with some files, my Proxxon with some Bullet shaped Silicon Polishers and Andrea Sculp, I began to work on the figure. This is one of the projects where I decided to put my whole heart into.
Well, this is the start on the figure.
First two pics are the figure as received (not cleaned up), second two pics are after I started working on it (still some work left, but I´m getting there).”
With Markus busy with the figure I continue working with the base. One of the concerns that I had with the scene was the layout. The train car is surprisingly large, and combined with a length of track, requires a good deal of space. My
concern was that the focal point of the scene, the prisoner and cart, would become lost in the dead spaces. My solution was to cut off the excess space along the front edge of the base with sweeping cuts around the focal points. The rear edge remains traditionally squared. For final presentation the “shaped” base will be place upon a taller squared base for final presentation, but we’ll see that later.
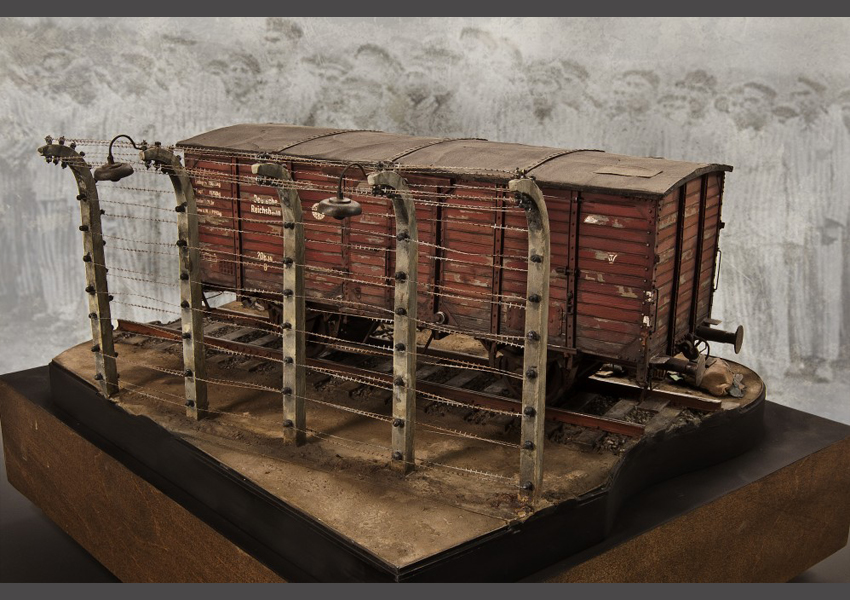
I began the base by first laying the tracks, securing them onto the base first using double sided tap and then really set using 2 part putty. The putty was used not only to secure the tracks, but to also build up the height of the rail bed. Into the putty I pressed and glued rail ballast. The fencing was secured onto the base in a

|

|

|

|

|

|

|

|
similar manner, by first gluing the post in place and then building up the ground level using two part putty. The remainder of the base is plaster mixed to a slightly runny consistency and then poured onto the base. The entire base is then set aside for a day or so to allow for drying.
One of the nice things about using plaster is that it absorbs the paint colors – in essence staining the plaster. I begin by adding the general earthen base colors by spraying acrylic colors using my airbrush. Next the details are picked out using a variety of finishing products; from pigments, acrylic paints, to artists’ oils. It is very much a back and forth affair as I will paint a certain section, adjust and then readjust the finish. Each layer is applied thinly, which over time creates a variety of tones and depth of finish.
While reading this narrative the long lapses of time between work stages may not be apparent, but trust me – there have been long periods of seemingly little activity. Art and inspiration are tricky things, some things they seem to flow easily and other times it is a struggle even to think about the next session. I know that it would be safe to say that Markus experienced those struggles. The painting of the stripes on the figure proved to be a daunting undertaking. The finish of the figure was crucial and Markus could feel the pressure. He had set a very high standard for himself and it would take the right moment for him to be able to proceed with confidence.

|
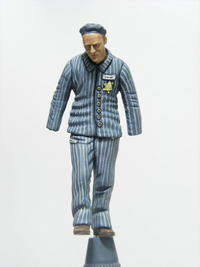
It was over the Christmas Holidays, 2011, that Markus found the time and renewed motivation to finish the figure. Once the finish painting was begun, life breathed into the figure. Markus sent me regular progress updates – carrying the email subject line title of “Burden of Stripes”. Each stripe being hand painted, subtle shadows and seem lines were added, and finally with the last brush stoke a masterpiece was born. The figure was finished and Markus sent it to me from his home in Germany to my home in the States. After waiting what seemed like a long time for the box to arrive there still was no box at my door. Markus did some inquiring and found that the box with the figure had been lost!!! Fortunately, in a short while the box did make it back to Markus – crushed – but the contents were fine. Once again the box was entrusted to the postal service, and this time the box arrived to my doorstep safe and sound. When I opened the package and first saw the figure my breath was literally taken away. Markus had indeed created and emotional work of art.
The long period of time while Markus had the figure had allowed me to basically finish the base. Now that the figure had arrived all that was left to do was the final adjustments and assembly. At the last minute I decided to sculpt more clothing as I felt that the larger piles would add to an overwhelming atmosphere of despair. The “new” clothing was painted and the overall base was giving a few touch-ups here and there. And with that I was finished. Overall, this project took nearly 9 months to complete. I am well aware that the subject of this piece may stir controversy. It is my hope that this piece stirs thought and emotion.
|

Postscript. Upon the completion of this piece I decided to post it onto the modeling forums – as I usually do. This time, however, I was quite anxious to see what the response might be from my peers. Forum history has demonstrated on more than one occasion that modelers who had posted “controversial” were often the subject of harsh ridicule. This is a “hobby”, some would say, “and subjects such as this have no place here”. Or, just the succinct…”this is no place for politics”.
However, much to my pleasure the response that I received was nothing less than remarkable. I am truly at a loss for words and humbled by overwhelming support Burden of Proof has received. Many called it a work of art, others suggest that it’s rightful place should be in a museum. Quite extraordinary!! The purpose of this piece was simply to tell a story: A story about sadness, hopelessness, and loss.
I wish to express my sincere thanks to Markus Lack for his outstanding contribution.

where did u find the fence kit
The fence posts are hand made and then copies cast from resin, the wire is fine mesh netting cut into lengths.