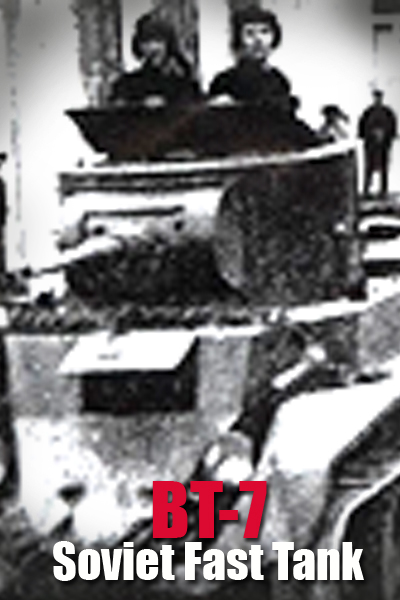
 BT is the abbreviation of the Russian term for “fast tank”, with the BT-7 being the last in a line of Soviet fast tanks designed during the 1930’s. Each tank in the series incorporated the Christie type suspension – as designed by J. Walter Christie. The BT series of tanks where also know as convertibles in that they could be driven either on tracks or on their road wheels, carrying their tracks with them. The rear set of road wheels where powered while the front set was steerable. In practical term, however, the removal and replacing of the tracks proved to be a laborious and time-consuming process, thus this option was often ignored by its crews.
During the Spanish Civil war the BT-5 tanks proved successful against the opposing light German and Italian armor used by the Nationalist. In 1939 the BT-5 and BT-7 tanks proved their combat success in border skirmishes with Japan, again outclassing the lighter Japanese tanks. At the outset of World War II the BT-7 was employed with success during against Polish forces during the Soviet invasion of Poland, but by the time of the German invasion of the Soviet Union in 1941 – Operation Barbarossa – the BT-7 was critically obsolete. As a result, large numbers of the vehicles where either lost in battle or abandoned by their crews during the first year of the campaign with very few surviving service beyond 1942.
I’d bet that I am one of the few armor modelers who have yet to build a Tiger, a Panther, or even a Sherman! Nothing against these vehicles, mind you, but my taste tend to wander toward the lighter tanks and vehicles. So, when Tamiya announced the BT-7 my heart quickened and my fingers danced across the keyboard as I attempted to obtain one of these new kits. Once again help came from MMI editor David Grummitt who magically (ok…he pulled some strings) was able to obtain this sample kit. I think that it is important for me to mention upfront that the kit that I was provided was truly a sample kit; meaning that not all of the kit parts where included nor where the instructions complete. There are certain times where I was required to scratch build parts or only assume a part placement. Ok, enough of the introductions – let’s get to building.

|

|

|

|
Rather than opting for the more traditional single piece tub hull, Tamiya has engineered a double side-wall assembly, along with a separate floor, nose and rear hull. Internally, a support frame is provided to help keep everything square and tight. Although this sounds complicated it all fits together quite easily and quickly the vehicle begins to take shape. The kit also provides a handy little jig for use when installing the suspension to ensure that the arms are properly aligned. Speaking of which, the suspension arms are designed to be attached in fixed positions with the use of pins, although it wouldn’t be difficult to show the suspension articulated if one wished to do so.
In keeping with some of their recent releases, Tamiya has chosen to provide link-n-length tracks for the BT-7 as well. The tracks have nice detail on both the outer and inner areas. A shorter length is given for the bottom run while a longer section takes care of the upper. Short, three track pad lengths bridge the gaps between the end road wheels and the drive/idler wheels while a single link sections are used to wrap around the ends. Once completed the tracks give a fine representation of the real vehicle complete with the slight sag in the upper run. One word of caution; the tracks are connected with definite male and female connection point which may lead to alignment issues if not observed. Of course, the fixed nature of the link-n-length tracks would prohibit articulating the suspension unless suitable substitutes were used.

|

|

|

|

|

|

|

|

|

|
The upper hull is a single part showing nice surface detail which also includes the engine louvers set in place; a nice feature. Unfortunately, my early release kit did not include any of the photo etched parts required for the engine intake vents or exhausts, though the instructions clearly indicate that they will be included for the production kits. Looking though my odds-n-ends box I found some very fine mesh screen that I used for the intake vents on the mid-section of the engine deck. I must say that this kit is very builder friendly. Included in the kit is another very handy jig designed to be used as a forming template for etched radiator cover. I was able to use this same jig to me help form and shape the scratch built part for the missing kit part. The remainder of the exhaust cover was made from bits of plastic strip glued into place over the mesh.
With the hull completed the final order of construction business is the turret. The 45 mm gun and coaxial 7.62mm machine gun are well done and include just enough basic details to give the viewer the hint of an interior. The excellent views of the interior will surely reward the ambitious modeler who decides to add interior details. The turret itself is constructed from a left and right half joined at the front and rear secured by the single piece roof and on the roof is added the periscope, lifting rings and vents.
If it’s Russian then it must be green….well, not exactly. One evening while looking on the internet for references I came across a color plate showing wonderfully striped vehicle belonging to the 24th Tank Brigade operating near Lvov, Poland during the Soviet invasion in 1939. Perfect; I had my vehicle reference and now it was time for paint. As usual I begin by applying an overall primer layer to give surfaces a nice, even finish for the steps that follow. The color layers began with an overall base color of Tamiya XF-11 J.A. Green followed by an application of a lighter shade of green made by adding XF-4 Yellow-Green and XF-57 Buff to the J.A. Green color. In each case the Tamiya paints are thinned using Tamiya lacquer thinner to the mix. The lighter colored camouflage stripe was painted using a mix of Tamiya XF-60 Dark Yellow and Yellow Green while the darker stripe was painted using Tamiya XF-69 Nato Black.
The subject of “chipping” always provokes a lively discussion among modelers with valid arguments to be made from every camp. From my point I believe that these marks are important to add interest and help tell the story of the vehicle; where it’s been, how hard it has been used, etc. In doing my small marks, however, I try to observe the “less is more” principal. With this in mind I applied a limited number of chips, scuffs and scratches to the vehicle using Vallejo German Camo Black Brown, USA Uniform Green and a fine tipped brush. I follow this with a wash of heavily diluted Vallejo paints, in this case German Camo Bright Green and Dark Sand, to unify the chips and camouflage colors. This acrylic wash begins the weathering process by unifying the colors and subtly introducing a bit of fading. A light misting of Johnson’s Future polish is used to seal the base in preparation of the finishing steps which follow.
I began the weathering by applying a mixture of MIG Productions Abteilung 502 Shadow Brown and Light Mud directly into all of the nooks and crannies of the vehicle. And then with a soft brush I feathered the paint and removed any heavy, unnatural accumulations. Although a somewhat subtle effect, I feel that this is an important step in creating a certain weight and depth to the final presentation. You may notice from the accompanying photos that I first put a dab of the paints on a piece of cardboard before using them. The cardboard  serves to leach out the linseed oils found within the paints resulting in quicker drying times along with a dead-flat finish. I follow the “shadow” colors again using MIG Productions artist’s oils, this time working dots of green colors over the green surface colors, yellow colors over the yellow stripes and so forth. The results are subtle variations among the surface colors adding additional visual interest to the model. Once this has dried I turned to MIG Productions Washes and Filters, this time concentrating only on the smaller lines and details applying the Washes and Filters as pin washes. Weathering for me is not a linear process so I often will return to adding more dots, then more pin washes until I have achieve an appearance that I am satisfied with appearance.

|

|

|
When it came time to apply the pigments I wanted to explore a new (to me) application technique. The idea is simple enough; apply dry pigments onto areas of wet artist’s oils. The oils serve a duel role as both a color foundation and a bonding agent for the pigments. On the BT-7 I used a mix of MIG Productions Light Mud and Basic Earth thinned with turpentine which I dabbed somewhat randomly onto the surfaces. A second brush loaded with pigment was used to add the pigments directly onto the moist paint. As one would expect the paints and the pigment colors mix together resulting in very pleasing effects. Once dried these color patches are permanent and provide an excellent foundation. I continued using the pigments using my familiar application method of applying the pigments wet using a small brush; the pigments 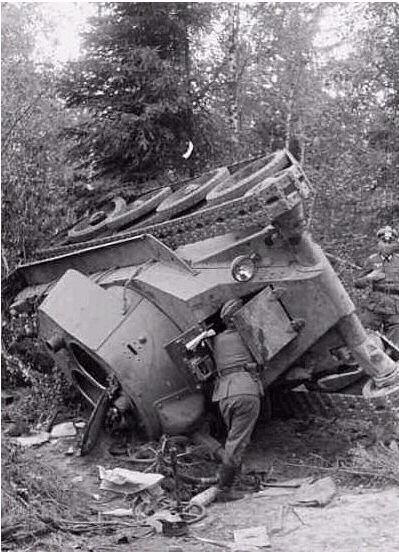 having been first dissolved in turpentine. I enjoy using the wet method as it offers a lot of control over the placement of the pigments. From time to time I will use a soft, dry brush to soften and edge or remove excess accumulations. Of course mud and dirt are not a precise science so I do in order to achieve a natural in appearance the modeler must capture the messy, random nature of mud and dirt. As a final step I used a brush and my finger to flick small droplets and splashes to the appropriate areas of the vehicle where such accumulations would naturally occur. As in all of these steps numerous thin applications are used to create the effects. I am also very mindful to continually vary the color mix in order to enhance visual interest.
Do you remember the “good old days” when kits fell together and looked great? Well, building this BT-7 brought back many of those fond memories for me. Tamiya has done another outstanding job of engineering a builder friendly kit that looks great straight from the box. This kit is the perfect companion to my collection of smaller tanks.