
![]() In the 3-ton (or medium) of transport trucks the major and most successful design was the Opel Blitz. This was a 1938 design from Opel (the German subsidiary then, as now, of General Motors) and was quite conventional in layout. The Opel Model S3.6-36, to give its maker’s designation, was a 4×2 vehicle with pressed steel cab and bonnet. Suspension was by conventional leaf springs. During its war production run, there were many special purpose variants produced; over 100 different types were recorded.
In the 3-ton (or medium) of transport trucks the major and most successful design was the Opel Blitz. This was a 1938 design from Opel (the German subsidiary then, as now, of General Motors) and was quite conventional in layout. The Opel Model S3.6-36, to give its maker’s designation, was a 4×2 vehicle with pressed steel cab and bonnet. Suspension was by conventional leaf springs. During its war production run, there were many special purpose variants produced; over 100 different types were recorded.
Most important of these featured a house-type body (Einheitskofferansbau) which could be fitted as a workshop, laundry, laboratory, command caravan, radio van, cipher office, ambulance, or for dozens of other purposes. The box-like house body was made of wood and compressed card, partly for ease of production and to save metal. Late in the Blitz’s production life it was similarly fitted with the famous ‘ersatz’ cab, a wood and pressed card structure know as the ‘einheitsfahrerhaus’, again as a major economy measure when steel became short.Getting straight to it, construction begins with the lower chassis which I assembled per the Tamiya instructions with only a small deviation to replace the stowage boxes with a new set of Aber brass. Tamiya has reproduced the double leaf spring suspension found on later production vehicles, though provided the early bolt patterned wheels. If you are using the kit wheels then the upper leaf spring should be removed. However, I found that the MIG Productions wheel set shows the later bolt design thus eliminating the need for modifications to the body. The MIG replacement wheels feature very crisp molding and make for a nice improvement over the kit parts; however the mounting holes are very shallow. The quick fix is to drill out the holes and/or shortened the axle ends to achieve the proper fit. I chose to also insert a section of brass rod for added strength. Continuing along with the construction I moved to the crew cab. Here again the basic Tamiya instruction are clear and assembly is straightforward. Deviating once again from the basic instructions I spent quite a bit of time dressing the cab with Aber brass, while Royal Models resin replaced the kit’s headlights. I also choose to replace the kit’s pioneer tools with some better detailed DML tools I had in my extra parts box.

|

|

|

|

|

|

|

|

|

|

|

|

|

|

|

|

|

|

|

|
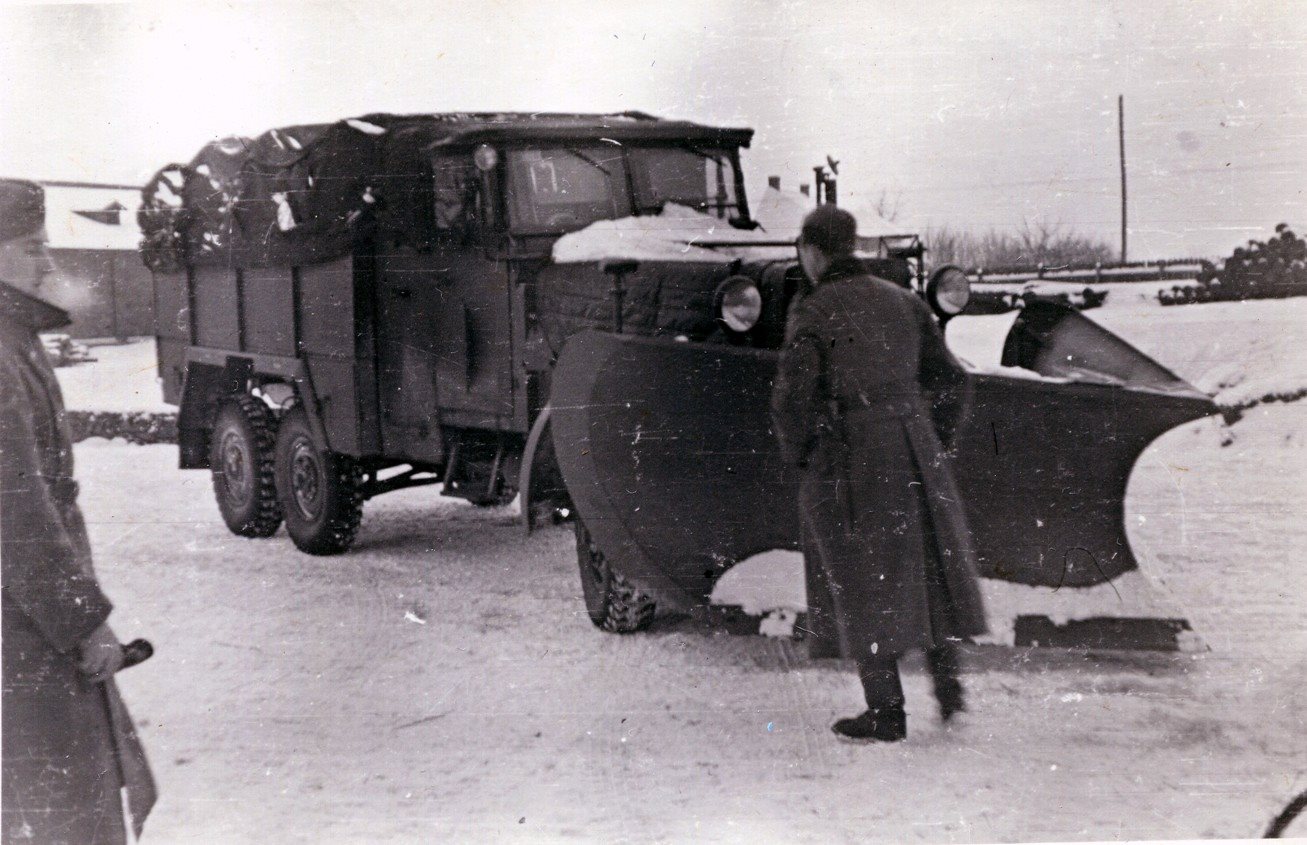
Moving forward, the impressive snow plow is from Plus Model. I approached this particular part of the construction, the plow, with some apprehension as it appeared very complex from the box top photos. Opening the box to take a peak at the minimalist instructions inside (line drawings) did little to boost my confidence. Once begun, however, I was pleasantly impressed by the logical sequence and sure fit of the parts. The only issue I found was that the Plus Model conversion is designed for the Italeri Mercedes L 3000 kit which required a little fudging on some of the bracket mounting. Nothing too drastic: Only requiring a little sanding here or a replacement bolt head there. The familiar Tamiya rear cargo bed features nice wood grain texture and some very inconvenient sink holes. Be prepared to spend a relaxing evening of puttying, sanding and re-scribing of the wood grain texture. Here again, the rear cargo area is supplemented with bits and pieces of Aber brass.
As coincidence would have it while working on this project I had been re-reading one of my favorite books, “The Forgotten Soldier”. This is a gritty account, which in part recounts the extreme conditions encountered by the supply troops of the Rollbahn serving on the Eastern Front. The descriptions of hardship, wear and fatigue provided me with ample inspiration for the painting of my workhorse Blitz. I recently read an article where the argument was being made that the bluish tones often associated with German Grey may be a misconception, as the color is actually based upon brown, or reddish brown hues. I decided to give this theory a try and added brown color into the Tamiya German Grey base color. The result is a very pleasing – warm shade of grey. And, although in real life the entire vehicle would have been initially painted with the same color I figured that especially over time the different materials of the trucks body (metal cab v. wooden bed) would weather and fade to slightly different colors. To create this distinction I added slightly more brown color to the mix while painting the cargo bed to get a slightly different base tone. Of course any respectable “Snow Blitz” would need proper camouflage; a rough winter white wash. I relied upon the “hairspray method” while also incorporating a kitchen pad to mask the pattern’s edges for a rougher, hand-painted look. The hairspray process is well documented and very simple. Briefly, over the base grey color and a protective coating of Johnson’s Future floor polish I misted a layer of hairspray. After letting the hairspray dry for about 1 hour I went about adding the rough, white stripes over top the layer of hair spray. Finally, again after about one hours drying time I used a small brush and water to scrape away flakes of the white camouflage paint. Finally, I went back over the white with a fine brush and white Vallejo paint and re-applied, or color mapped some of the chipped areas to add refine some detail in the flaked off areas. I followed with some localized chipping and scratches to the cab’s running boards and fenders using rusty brown colors and a scouring pad. Next came a few very light acrylic color washes over the entire surfaces to unify the colors. I wanted to continue to accentuate the different color tones between the cab and wooden cargo area so on the cab my filters consisted of brown and cream colors, while the cargo bed was filtered using a little touch of green in the color mix. The next phase of the weathering process is the familiar back-n-forth process of adding detail and depth to the finish. MIG Productions 502 Abteilung artist’s oils were used to add depth, define details, and additional color tones to the finish. Here again I tried to vary my color choices to emphasis the subtle color variation between the metal and wooden surfaces. Through-out the process my bottle of Vallejo white continued to be used to refresh the white camouflaged areas if they became too discolored by the oils. For a little added color (and have some fun) I decided to paint the mounting brackets for the snow plow in rusty metal colors. Base colors were applied using Tamiya and Vallejo colors with the finishing touches being made using MIG Productions 502 Abteilung artist’s oils and pigments. The business side of the snow plow blade was first painted using Model Master Metalizer Stainless Steel to achieve a nice, polished steel finish. To weather the metal finish I first moistened the blade with tap water and then applied a fairly heavy layer of salt, especially over the lower blade. To the upper areas I sprayed light areas of brownish rust colors to replicate surface blemishes and stains. Finally, I applied light “washes” of MIG pigments dissolved with thinner to further discolor the surface. Finally, I decided to try and replicate some light snow build-up on some of the more exposed areas of the vehicle; wheels, plow bracket, front bumper and tarpaulin. For this I used MIG Productions Ashes White pigment mixed with MIG Productions acrylic resin as the basis and then added glass spheres – or micro balloons – for a topical sparkle. In certain areas I muddied-up the snow by applying thin washes of earthen artist’s oil colors over the snow.
 Somewhere in the shuffle of all of the aftermarket extras there is the Tamiya Opel Blitz. My impression of the kit is much like that of the Blitz itself; nothing too fancy but it servers it’s intended purpose well. Adding the Plus Model snow plow certainly makes the “ordinary” Blitz into something quite unique, and impressive. The images in your mind created though reading can invoke emotions often not felt by simply studying photographs; attempting to capture these emotions in your work brings new challenges – and opportunities.
In the 3-ton (or medium) category the major and most successful design was the Opel Blitz. This was a 1938 design from Opel (the German subsidiary then, as now, of General Motors) and was quite conventional in layout. The Opel Model S3.6-36, to give its maker’s designation, was a 4×2 vehicle with pressed steel cab and bonnet. Suspension was by conventional leaf springs. During its war production run, there were many special purpose variants produced; over 100 different types were recorded. Most important of these featured a house-type body (Einheitskofferansbau) which could be fitted as a workshop, laundry, laboratory, command caravan, radio van, cipher office, ambulance, or for dozens of other purposes. The box-like house body was made of wood and compressed card, partly for ease of production and to save metal. Late in the Blitz’s production life it was similarly fitted with the famous ‘ersatz’ cab, a wood and pressed card structure know as the ‘einheitsfahrerhaus’, again as a major economy measure when steel became short.Getting straight to it, construction begins with the lower chassis which I assembled per the Tamiya instructions with only a small deviation to  replace the stowage boxes with a new set of Aber brass. Tamiya has reproduced the double leaf spring suspension found on later production vehicles, though provided the early bolt patterned wheels. If you are using the kit wheels then the upper leaf spring should be removed. However, I found that the MIG Productions wheel set shows the later bolt design thus eliminating the need for modifications to the body. The MIG replacement wheels feature very crisp molding and make for a nice improvement over the kit parts; however the mounting holes are very shallow. The quick fix is to drill out the holes and/or shortened the axle ends to achieve the proper fit. I chose to also insert a section of brass rod for added strength. Continuing along with the construction I moved to the crew cab. Here again the basic Tamiya instruction are clear and assembly is straightforward. Deviating once again from the basic instructions I spent quite a bit of time dressing the cab with Aber brass, while Royal Models resin replaced the kit’s headlights. I also choose to replace the kit’s pioneer tools with some better detailed DML tools I had in my extra parts box.
|
|
|
|
|
|
|
|
|
|
|
|
|
|
|
|
|
|
|
|
|
|
|
|
|
|
|
|
|
|
Moving forward, the impressive snow plow is from Plus Model. I approached this particular part of the construction, the plow, with some apprehension as it appeared very complex from the box top photos. Opening the box to take a peak at the minimalist instructions inside (line drawings) did little to boost my confidence. Once begun, however, I was pleasantly impressed by the logical sequence and sure fit of the parts. The only issue I found was that the Plus Model conversion is designed for the Italeri Mercedes L 3000 kit which required a little fudging on some of the bracket mounting. Nothing too drastic: Only requiring a little sanding here or a replacement bolt head there. The familiar Tamiya rear cargo bed features nice wood grain texture and some very inconvenient sink holes. Be prepared to spend a relaxing evening of puttying, sanding and re-scribing of the wood grain texture. Here again, the rear cargo area is supplemented with bits and pieces of Aber brass.
As coincidence would have it while working on this project I had been re-reading one of my favorite books, “The Forgotten Soldier”. This is a gritty account, which in part recounts the extreme conditions encountered by the supply troops of the Rollbahn serving on the Eastern Front. The descriptions of hardship, wear and fatigue provided me with ample inspiration for the painting of my workhorse Blitz. I recently read an article where the argument was being made that the bluish tones often associated with German Grey may be a misconception, as the color is actually based upon brown, or reddish brown hues. I decided to give this theory a try and added brown color into the Tamiya German Grey base color. The result is a very pleasing – warm shade of grey. And, although in real life the entire vehicle would have been initially painted with the same color I figured that especially over time the different materials of the trucks body (metal cab v. wooden bed) would weather and fade to slightly different colors. To create this distinction I added slightly more brown color to the mix while painting the cargo bed to get a slightly different base tone. Of course any respectable “Snow Blitz” would need proper camouflage; a rough winter white wash. I relied upon the “hairspray method” while also incorporating a kitchen pad to mask the pattern’s edges for a rougher, hand-painted look. The hairspray process is well documented and very simple. Briefly, over the base grey color and a protective coating of Johnson’s Future floor polish I misted a layer of hairspray. After letting the hairspray dry for about 1 hour I went about adding the rough, white stripes over top the layer of hair spray. Finally, again after about one hours drying time I used a small brush and water to scrape away flakes of the white camouflage paint. Finally, I went back over the white with a fine brush and white Vallejo paint and re-applied, or color mapped some of the chipped areas to add refine some detail in the flaked off areas. I followed with some localized chipping and scratches to the cab’s running boards and fenders using rusty brown colors and a scouring pad. Next came a few very light acrylic color washes over the entire surfaces to unify the colors. I wanted to continue to accentuate the different color tones between the cab and wooden cargo area so on the cab my filters consisted of brown and cream colors, while the cargo bed was filtered using a little touch of green in the color mix. The next phase of the weathering process is the familiar back-n-forth process of adding detail and depth to the finish. MIG Productions 502 Abteilung artist’s oils were used to add depth, define details, and additional color tones to the finish. Here again I tried to vary my color choices to emphasis the subtle color variation between the metal and wooden surfaces. Through-out the process my bottle of Vallejo white continued to be used to refresh the white camouflaged areas if they became too discolored by the oils. For a little added color (and have some fun) I decided to paint the mounting brackets for the snow plow in rusty metal colors. Base colors were applied using Tamiya and Vallejo colors with the finishing touches being made using MIG Productions 502 Abteilung artist’s oils and pigments. The business side of the snow plow blade was first painted using Model Master Metalizer Stainless Steel to achieve a nice, polished steel finish. To weather the metal finish I first moistened the blade with tap water and then applied a fairly heavy layer of salt, especially over the lower blade. To the upper areas I sprayed light areas of brownish rust colors to replicate surface blemishes and stains. Finally, I applied light “washes” of MIG pigments dissolved with thinner to further discolor the surface. Finally, I decided to try and replicate some light snow build-up on some of the more exposed areas of the vehicle; wheels, plow bracket, front bumper and tarpaulin. For this I used MIG Productions Ashes White pigment mixed with MIG Productions acrylic resin as the basis and then added glass spheres – or micro balloons – for a topical sparkle. In certain areas I muddied-up the snow by applying thin washes of earthen artist’s oil colors over the snow.
Somewhere in the shuffle of all of the aftermarket extras there is the Tamiya Opel Blitz. My impression of the kit is much like that of the Blitz itself; nothing too fancy but it servers it’s intended purpose well. Adding the Plus Model snow plow certainly makes the “ordinary” Blitz into something quite unique, and impressive. The images in your mind created though reading can invoke emotions often not felt by simply studying photographs; attempting to capture these emotions in your work brings new challenges – and opportunities.